Showing posts with label Video Game Design. Show all posts

Friday, November 3, 2017

2D Themed Environment Design: Theme Park, Retail, Restaurant, and Virtual Worlds[ Websites, Video Games etc.]

 
 Here is a sampling of my 2D Design Work sketches for Themed Environments.

2D Themed Environment Design Theme Park, Retail, Restaurants,and Virtual Worlds[ Websites, Video Games etc.]

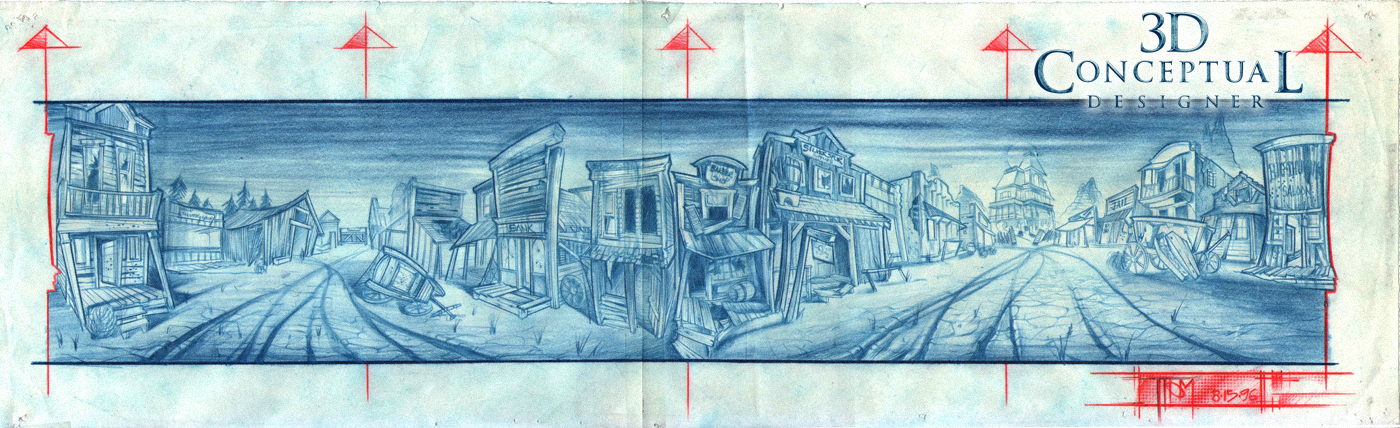
With decades of 2D design work under my belt I have been privileged to assist in the creation of themed entertainment venues for a variety of clients in my career as a 3D Conceptual Designer. Environmental Design is a part of our training at Art Center when we go into Industrial Design, as we are prepared to interface with professionals of various disciplines to accomplish the themed look for whatever the end use may be.

I have worked for the larger Theme Park companies Walt Disney Imagineering, Universal Creative, as well as Landmark Entertainment Group. I have also been able to work for a few of the boutique studios like Sotto Studios, as well as the application of themed entertainment into retail, especially restaurant thematic design.

This skill set was also called upon for a virtual location for online work with Cyan Worlds up in Spokane WA back in 2000, to develop virtual worlds for the online versions of the popular games them make. I was connected with them while still at Imagineering and brought up to assist with those needs starting with 2D themed concept designs that would be built in 3D with a full architectural team and game team.

Themed design environment creation and Concept Art is also used in TV Animation work for various projects I have been on, including The Phantom 2040, Flash Gordon, and others.

If you have a need for thematic design from as small as freelance work, to a full relocation and full-time work, you can contact me here.

                                                         Cheers, THOM

NOTE: Blogger has limited file size, for the full size image go here.


Wednesday, August 14, 2013

Project Review: Fight Lab 3D Logo Exploration for THQ Game Studio 2009 PART I

The THQ Fight Lab 3D Logo had to include barbed wire and a fist int he typography solution as well.

 A 3D Logo with crossed fists and barbed wire top and bottom like this.

 I curved the extrusion as a typical car emblem has so the reflection horizon would fall where I wanted it to, and it is better for lighting than a flat surface.

 The fist would animate in for MGFX apps in this solution with the type hanging on the the sheet music barbed wires.

 A BIG fist icon with the smaller type over the holding device for THQ.

 Did an alternate with double fists and the type in the negative space.

 A spiral of ever decreasing scaled fists on each side in this version. I was inspired by this KA logo.

 The dueling fists turned out to form a "V".

 Fists as bookends with the logo inside the locked in barbed wire.

 Love the cut out in this type provided to me.

 A shot with a whole bunch of barbed wire, double fists, and a Single-point-beveled type treatment, my design, my fave.
Project Review
Fight Lab 3D Logo Exploration
for THQ Game Studio 2009
PART I

Client: THQ via Wellbrand Inc. via The Cimarron Group.
Art Direction: Goutam Mitra.
Project Date: May 2009.

        Back in May 2009 I was still in-house at The Cimarron Group[ R.I.P.], and I would bring work into the department from outside using a producer friend, Goutam Mitra a fellow ACCD ID grad whom I have had the pleasure of working with for a few decades, and he brought this 3D logo work to me from THQ.

I did 2D conceptual design work for THQ a decade earlier on the Scobby Doo Game here, so I was familiar with the game companys product and level of quality. THQ wanted to start a second division for MMA games called at the time 'Fight Lab", and I developed a series of two dozen 3D logos with some key images as directed.

It was to have a clenched fist, as well as some barbed wire or chain link for a cage fight type of feel, so off I went to develop the 3D surfaces for the Logo. You will note that there are no textures on the project as I did form studys first.

Sadly THQ went out of business and the Fight Lab name changed to RAGE anyhow, so these were not used.

In this first part, we've looked at the first half of the logos for Fight Lab, look for added parts in the days and weeks to come.

Cheers, THOM

Tuesday, May 14, 2013

Project Review: Disney Interactive- The Lost Family Tree: Visual Development 1999 PART I

 Interior of Tiggers Treehouse
A 3D Blocking Model is a basic representation of a 3D or 2D layout scene. Proportions, staging and design are what are locked in, as all detailing comes much later.


 A reverse angle shot shows that the details were not extended to the other side of the room as seen in the faux chair back on the left.


 A side view render on the bed side of the room with Tiggers drawing spring "bounce" stool in the foreground.


 A Birds-Eye extreme down shot to show the whole sic wall full interior set I blocked out for the Tigger tree house for the Development work from 1999.


 Here is an original render from back in 1999 of the exterior set with what I referred to blocking stage Two: This had more details mocked up like bricks and separate parts for the various boards and such.


Project Review
Disney Interactive- The Lost Family Tree
Visual Development 1999 PART I

Client: Walt Disney Interactive[ DI ]
Art Direction: Myself.
Project Date: Summer 1999.

I worked in-house at Walt Disney Interactive back from 1996 to 1998 as a 3D Art Director on their big product back then, a multi-disc CD-ROM game[ Nodes and Rails Old Time] called Virtual Magic Kingdom, and once I left DI, I moved across the street to WDI, [Walt Disney Imagineering] as a contractor Imagineer for a few years. However I had at that time a half day commitment from DI to freelance in the mornings, so I was called back to help out with a new game based on Pooh and The Hundred Acre woods called The Lost Family Tree.

I had worked in 2D TV Animation in an Art Director/ Conceptual Designer capacity in the past so I suggested that we block out the entire 100 acre woods locationsmatching each location to the original watercolor and ink backgrounds from the original film first. They all agreed so I was off in blocking out the game.

Each location had an interior and exterior set, and since I was matching 2D artwork the interiors were exagerated to make them bigger than the outside structures would allow so I made an exterior full 3D world, and all interiors were separate 3D sets, and we would transition in game play from the outside set to the interior ones for some continuity.

What you see today is the basic blocking for the main Tigger house with the interior shots and one original exterior rendering frame from 1999 rendered in 3DSmax version 1.

3D Blocking is similar to 2D blocking which I did for all my Phantom 2040 work, as it allows you to lock in the shots with minimal geometry, and once the basic proportions are done, each location can be handed off to a 3D team for final high-rez re-modeling efforts.

In this case DI played with the thought of using the 3D blocking to create 2D layouts grids so the look could be a watercolor original feel and not 3D, but in 1999 this was too costly and the game was shelved for good.

A super fun project as I got to rebuild the main sets from one of my favorite Disney films.

Look for added posts in this series in the future.

                                                                                                   Cheers, THOM

Wednesday, April 24, 2013

Project Review: Reels Slot Machines:Facebook App 3D Gamescreen Modeling 2012

 The final Subdivided 3D Model shot sent over to Chris at Blind for the App Reel Slot Tournament.

 The Base Quad Polygon Model without subdivision as delivered to the team and exported out as an OBJ and FBX for the Maya and C4d users.

 An overall Birdseye screen shot showing the build out for this App Game Screen.

 A close Up shot on the switch and blub panel from the lower right of the screen[ NOTE: The curled filaments inside the vintage 'nipple-top'bulbs]


 A close up on the Horn, and Marque details built and designed out in 3D for the App on Facebook.

 The Flipping/Rotating Player cards were built out in a tube frame to the LEFT.

 The original scrap I stated with on this one day Game Screen 3D Design and Modeling Gig from the Summer of 2012.

 A small screen Cap taken from the Facebook page of this App as it was finished out by the folks at Blind.


Project Review
Reels Slot Machines:Facebook App
3D Game-screen Modeling 2012

Client: Reels Slots Apps via Blind.
Art Direction: Chris Do.
Project Date: June 2012.

I had worked with Chris Do in the past on the Raveonettes Music Video where he won an Emmy for the Art Direction on it[ I did get Honors], and he had another fun task, only this time he needed 3D Modeling done for a game-screen for a slot App on Facebook.

I gladly took the work and was given a direction sheet to work off of and had a day or less to complete the job. I built out the assets as all subdivision models since this was to be exported out to their in house 3D team for finishing up.

A very fun assignment as I got to do 3D Design while I built it out as the direction gave me room to explore the designs a bit, and it was super fun to do. Enjoy the posting.

You can review my prior work with Chris Do from the Raveonettes here.

Cheers, THOM

Tuesday, May 8, 2012

Project Review: SEGA's Molecule Man Part II- 1995

 Here is the final Color-erase line art for Molecule Man in Metal. You can see the Marker Comp Color Key here.


 Here is the rough sketch that preceded the above drawing, a bit quicker of a comp.


 Molecule Man as Vapor. I had his extremities 'leak' a bit of smoke constantly in the design.


 Molecule Man as water. The Color is here.


Project Review:
SEGA Interactive- Molecule Man 1995
Part II

Client: SEGA Interactive Group.
Art Director n/a.
Project Date: Summer 1995.

This is my second posting for the brief work I did for Sega out in Diamond Bar CA. back in 1995 for the video game called Molecule Man.

They hired me as a conceptual designer to develop the looks of the character as he would transform from one element to another. I did the various versions in Water, Vapor, Metal, Glass etc.

For todays posting, I have the final line are for a few designs as well as the rough sketch for the metal version we used to move ahead with the poses. I happened to have just finished my Phantom 2040 work so was versed in tight fitting superhero drawing as I had been doing it for a few years by then.

You can review my first post here.

Cheers, THOM

Thursday, April 5, 2012

Project Review:Virtual Magic Kingdom-Video Game-PART VIII: Main Street USA Curvilinear Perspective Sketches


 A better full scan of the first 360 Quicktime VR styled sketch that I did back at Disney Interactive back in the 90's.


 Here is a close up of the Left side of the sketch looking back at the entry and the train station.


 The Middle of the sketch is looking across Main Street USA at the Arcade. You can see Cinderellas Castle on the right there at the main Hub too.


 A close Up of the RIGHT side of the wrap with the Theater entryway there and a sandwich board I used as the 'seam' to link it together in a 360 like this..


Project Review: 
Virtual Magic Kingdom Video Game PART VIII
Main Street USA Curvilinear Perspective Sketches

Client: Disney Interactive
Art Director: Myself
Project Date: Summer 1996

This is my eighth post in my series on the Virtual Magic Kingdom [ VMK] project I did for Disney Interactive back in 1996-7, and with this post, I cover  last big HUB perspective wrap that I did in preparation for the project, Main Street USA.

I was originally hired as a freelance sketch artist and, Concept Designer, but after a month I was offered a 3D Art Director position on the project to direct the efforts to build this out, and happily took the offer and worked for them for just over a year.

This was also the first 360 sketch I ever tried, and the M.C. Escher technique I extracted from the books of his, definitely worked well. Here is the under drawing I did for this as a partial sketch.

I have this higher resolution scan for this hub, which was seen as a very small image posted early on, as seen here, but today I have isolated close up's of each part of the 40" wide drawing I did for Disney Interactive back in the 90's so you car review the details much better.

You may review my earlier VMK posts in these link-a-dinks:

PART I
PART II
PART III
PART IV
PART V
PART VI 
PART VII

Cheers, THOM

Tuesday, March 27, 2012

Behind the Art: The Under Drawings PART II-ScoobyDoo


Here is the under drawing I did for the Scooby Doo Project with Heavy Iron from the 90's for this crypt area of the video game. You can view the final here


One of my favorite sketches for the Scooby Doo game, was this overhead on the above ground graveyard. Here is this final as delivered.


A Secret Laboratory[ final here ] in a rock cave from Scooby Doo the Video Game from the 90's.


The underdrawing I did for this shipwreck cove from Scooby Doo, with the final here.

Behind the Art
The Under Drawings
PART II Scooby Doo

Today I have posted PART II  in this new series of under drawings for various 2D projects.

The under drawing sets the look for the final in a way that is still rough enough to change and add details too, but also clean enough so that my "Non-Artist; clients can easily see the main direction, and enough of my intent to sign off on the next step with the details.

Today I have posed up four examples for the Scooby Doo project I did in the nineties for Heavy Iron Studios here in SoCal, and I posted that work here, if you are interested.

Now, the under drawings are not just a part of the way I create a piece for a client, but also an integral part of the process of approvals I have with them, so I can get sign off for the time consuming final line work stage as well as any thing else before time and $$ is used up on the details, without a clear picture of the overall look and proportions needed for the project.

 I usually put an under drawing over a hand made perspective grid I have made using ship curves, but for these examples, I put a quick grid on the under drawings themselves as seen above.

I do most of these on a 8.5 x 11 piece of generic copy paper, which is abundant and cheap for this. I usually do the final overlay on Clearprint or 'Vincent' Vellum.

You can view PART I of my under drawing posts here.


Cheers, THOM

Tuesday, March 20, 2012

Behind the Art: The Under Drawings PART I

 This is an under drawing I did for the Wildstorm Productions GEN 13 Movie from back in the mid 90's as seen here, from this post.

 I had the honor of working on the Raveonettes Music Video "Heart of Stone" here, I did a few production design sketches including the above one here, which won an Academy Award for Art Direction, and so I got a little recognition here.

Here is a partial under-drawing for the wide panoramic curvilinear perspective shot of Main Street here, done for Disney Interactive for the VMK[ Virtual Magic Kingdom] project from back in the 90's as well.

 Inside the big clown head in the middle of the Fantasyland map here, was a circus tent like game. Here is the rough under drawing.
 
 I actually started to flesh out that above view, and scanned it in progress as we see here in this Fantasyland design. This room eventually made it into the final single disc release.


Behind the Art
The Under Drawings
PART I

Today I have posted a series of under drawings for various projects that have been posted here on my design blog over the last few years as a PART I, in a new ongoing series I will do over the next few months.

Under drawing is the practice of doing at least two passes on any design with this first pass drawing used to fully block out a shot, to get basic proportions.

 I usually put an under drawing over a hand made perspective grid I have made using ship curves, but for some the grid is on the under drawing itself as well.

The first great advantage to this method of sketching allows you to be able to make bold design choices at the sketch time, since the piece you are on is NOT the final, so you are a bit more free on this stage. 

I also tend to scan and send out this stage to a client who is strapped for cash[ everyone now!], to give them a better idea of what I am planning on doing next. 

The last advantage is that the under drawing takes a short time, about 1/10th the final line and shading stage, so if you want to make any changes, the time to do this is when it is blocked out in the under drawing, BEFORE the time and cash have been spent on a possible differing camera view, or design choice.

Cheers, THOM

Thursday, March 15, 2012

Project Review: Virtual Magic Kingdom PART VII-Curvilinear Perspective Wrap-Frontierland


 Here is a scan of the clean Curvilinear Perspective Grid I made from North , East, South, and West vanishing points for these wraps.


 Here is the 38" wide Frontierland full HUB sketch I did back in the mid nineties.


 Here I overlay the grid over my sketch so you can see how I followed the base grid  for my drawing.


 Here is a close-up shot of the far LEFT of the sketch looking to the gate.


 The middle of the  wide sketch with the various old buildings.


 A close Up of the RIGHT side of the wrap with the Haunted Mansion there at the end on the hill.


Project Review: 
Virtual Magic Kingdom Video Game PART VII
Frontierland Curvilinear Perspective Sketches


Client: Disney Interactive
Art Director: Myself
Project Date: Summer 1996

This is my seventh post in my series on the Virtual Magic Kingdom [ VMK] project I did for Disney Interactive back in 1996, and with this post, I cover  third HUB perspective wrap that I , and this time I worked on a old muddy, rutted road with the town of Frontierland smack in the middle. You can view the rest of Frontierland here.

We put the Haunted Mansion on on end of the town, and the big Gate on the other that leads back to the HUB. You can also see this in my large overhead sketch here. A fun exercise to develop the overall look and be able to see it in 360 degrees as well.


I have taught fish-eye perspective using grids for years, it certainly helps you visualize a real dimensional space, as this sketch was then built out in 3D for the game in Alias Wavefront[ Pre-Maya days] by the talented 3D team.


You may review my earlier VMK posts in these link-a-dinks:

PART I
PART II
PART III
PART IV
PART V
PART VI

Cheers, THOM

Thursday, March 8, 2012

Project Review: Virtual Magic Kingdom PART VI-Curvilinear Perspective Wraps

 Here is the full 360 wrap for the Adventureland hub, near the Jungle Cruise for the Video Game we were developing back in the 90's at Disney Interactive.


I printed this out on the color xerox and made a cylinder that you could stand-up and view to get the feel for the space in 3D[ it worked great!], a 2D version of Quicktime VR from the era in sketch format!  Here is a 3D Mock-Up to Illustrate this technique


A close up on the RIGHT side of the wrap with the Pavilion in center.


A close Up of the LEFT side of the wrap with the Queue for the Jungle Cruise.


Disney Interactive: VMK
Virtual Magic Kingdom DVD Game
Curvilinear Perspective Wraps

 Part VI

Client: Disney Interactive
Art Director: Myself
Project Date: Summer 1996

This is my sixth post in my series on the Virtual Magic Kingdom [ VMK] project I did for Disney Interactive back in 1996, and with this post, I cover a second perspective wrap that I did for a full 360 view from one of the game "Nodes".

They wanted a single sketch that would help them visualize the view from a specific point in the hub at the Virtual Disneyland Park we were making for the Virtual Magic Kingdom game so I did a sketch for each land.

You will notice that the artwork uses the fish-eye perspective grids I based on M.C. Eschers study of this drawing method, so I developed it to the project. I even taught the team curvilinear perspective to follow the theme we had for this game. A very fun time I had there with a great team, and now that I am back doing work for WDI, I pass by the old building on a regular basis.

You may review my earlier VMK posts in these link-a-dinks:

PART I
PART II
PART III
PART IV
PART V

Cheers, THOM