Showing posts with label 3D education. Show all posts

Wednesday, July 23, 2025

Project Review: Mortal Engines Main Title treatment concepts May 2017


Mortal Engines 3D Main Title Key Art- My third conceptual design pass at the Main Title with a deconstructed modern facade over and older substrate material.


Mortal Engines 3D Main Title Key Art- A screen grab in a simple clay shader to showcase the surfaces without textures.


 Mortal Engines 3D Main Title Key Art- Another screen grab in a simple clay shader to showcase the surfaces with displacement. Up close you can see that the edges are rough, but for deadline and cost we went this direction until it was picked, which did not happen.


Mortal Engines 3D Main Title Key Art-  A textured screen grab shows the internal details on the "Dot" in the engine icon in the middle of the "O" in Mortal with the Aqua glass material showing thru to the inner workings.


Mortal Engines 3D Main Title Key Art- this screen grab in 3DS max shows materials as well as the pixelated displacement map used to push the geometry in and out.


Mortal Engines 3D Main Title Key Art- This design was the most simple of them all, with some cracks in the design and was a bit brighter as well.


Mortal Engines 3D Main Title Key Art- A Z-Depth is always supplied so Art Directors can adjust the image based on distance, Smart 3D


Mortal Engines 3D Main Title Key Art-A screen grab in a simple clay shader to showcase the surfaces without textures.


Mortal Engines 3D Main Title Key Art-an angled view screen grab in a simple clay shader to showcase the build.


Mortal Engines 3D Main Title Key Art- This Title treatment was in the middle of the top two designs, with a bit more distressing as well as a second inner surface poking through the top one.


Mortal Engines 3D Main Title Key Art- Screen grab in a simple clay shader to showcase the surfaces without textures


Mortal Engines 3D Main Title Key Art- A screen grab in a simple clay shader showing the dual surface model inside the typeface.


Project Review
Main Title Treatment Concepts
May 2017
 

Client: Universal Pictures via BOND
Creative Direction: 
Patrick Dillon. 
Project Date:  May 2017.


     Today I can post the work I did for Patrick at the BOND Agency for Universal Pictures post apocalyptic film Mortal Engines released in theaters in 2018. 

     I was excited about building a Title for the film due to the nature of the story with repurposed architectural elements that were weathered and built over other parts with layers and aging.

       I did three concepts with the third and favorite one up at the top of this post, with it getting progressively simpler in each design. Each has a distinct aqua glow around the dot in the center of the letter "O" in Mortal as an engine icon with light and power illumination the title.
 
     This post include some Behind the Art  with some review on the textures I built, and the use of a displacement map that I created for the custom designed plates over a substrate material indicative to the production design use of architecture in the moving city's in the film build up of old world architecture with modern Sci Fi parts built over the top.

      With displacement it is quicker than building it out in geometry, but it has limitations due to the density of the mesh to get a smooth displacement. In the close ups you can see that I had to use a lower resolution at this the Comping stage. If finished I was going to rebuild all of it without displacement and use quad subdivision building. I was actually hoping to go to the next level with this.

     I have an inner and outer object on two of the designs so as it displaces the underlying substrate material pops thru as a 2 layer design.
 
     For a different client I was able to build out all the layers as geometry and I hope in the future to post that. That model was for a film opening concept fly through so displacement was not going to work, and it was ll hand built, but they had a bigger budget and time frame so we could achieve that.
 
     I am still doing freelance now as I hunt for a full-time place to work at, so if you need a bid for a 3D Illustration or 3D Logo, or a 3D Model feel free to contact me for a quote. I am open to Hourly gig's, Work Retainers, Part-time, and Full Time opportunities [ Open to relocation ] would be best.

I have worked remote since 2009, so I am ready to help you.

                                 Cheers, THOM

Thursday, September 28, 2017

Transportation [Car Design] 3D Rendering, Design, and 3D Printing for Automotive


A Sample of my 3D rendered Car Designs and Illustrations.

Transportation [Car Design]
3D Rendering, 3D Design, and 3D Printing for Automotive

Automotive design is what I was trained in at both CCS in Detroit, and finished up at Art Center in Pasadena California with a Degree in Transportation Design Fall of 1991. My first few jobs were sketching Car commercial mood boards and storyboard frames out of school, a typical path for many aspiring Entertainment Design seeking Transportation Design majors going into work in Hollywood. I worked on a dozen or so commercials in 2D for Mitsubishi, Chrysler, Lexus, Cadillac, Lincoln, Ford, and others. The directors liked to hire car majors as we were specifically trained to get the product right, the car. so we also ended up developing the futuristic set designs behind the cars as well as most of us were all Science Fiction geeks as well.

As time went on the development of 3D rendering has become photo realistic, with over 90% of the television and print work you see is actually not photography any longer, but 3D rendering of a Digital or Virtual Car.  For 3D Automotive work I have worked on Lotus, Mitsubishi[ again], Honda, Hyundai, Smart Car US, and a few others.

I have been working on virtual cars since my first full car in 3D back in 2003 for a pitch we made at The Cimarron Group to Lotus for the US launch of the Elise. At the time the cars were not in the US, though they did the show circuit and were at an LA auto show. I found a full set of pictures online as well as a blueprint for basic dimensions and proceeded to hand built the car from scratch in 3D.

As an advanced surface artist, 3D modeling a car was a virtual version of working in clay,. only the speed was much faster. A clay model was about 200 hours or work to finish, and I build out the full exterior of the Lotus in about 50 Hours. Mirroring objects that is available in 3D allows for perfect symmetry and you basically build half the car at a time and then modify each side for side specific details.

I have built my favorite car as well, a Vintage Volkswagen Bug for the rebooting of the Herbie franchise for Disney and got to build a 1963 Rag Top bug, from every part inside out and x-ray. This was used in the advertisements on TV and trailers in theaters.

Some clients like Honda wisely provide the model to you, so your time is spent dialing in the materials and lighting of the car. For this part a fellow ACCD grad and I were honored to visit a ACCD Grad Jerry Garns a master at automotive lighting, and translated his studio lighting into our 3D world.

My most recent adventure in 3D Transportation work and been to build out a full 3D asset for 3D Printing of a 1937 Sterling-J Pre War semi truck. The truck is currently being constructed out is Northern California, and I can't wait to see the final results.

 I have added a button on the right to quickly reference this in the future.

If you need a visualization or a 3D Model build or a piece of transportation design please contact me.

Cheers, THOM

NOTE: Blogger is limiting Image Size, a full size detailed image can be seen at this link.

Tuesday, August 23, 2011

Tutorial Tuesday: How to Model a Single Point Bevel Part I

STEP I
A Live font as a spline of the logo, save this as the first version.


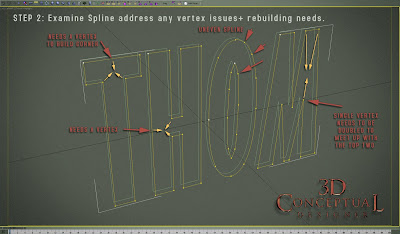
STEP II
Copy and convert the live-spline to an editable spline and evaluate the vertex and geometry needs.


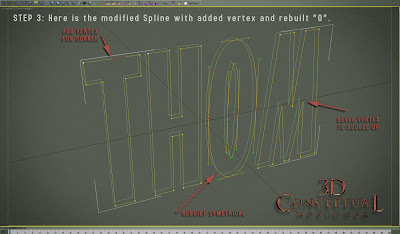
STEP III
Add in the vertices and rebuild any parts for symmetry and clean up. The more you do at this stage the easier.


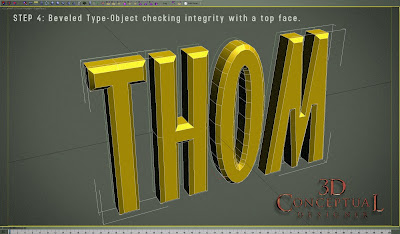
STEP IV
Verify the type is to put on the stock bevel modifier and put a bevel on it to see if t any corners cross over or the holes are plugged[ revers or double splines], and continue to clean until it looks right.


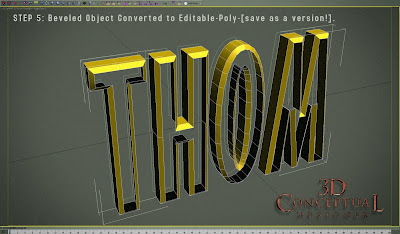
STEP V
Once the spline is verified, remove the "caps" front and back so it is just the extrusion, and the bevel, then convert it to an editable polygon object.


STEP VI
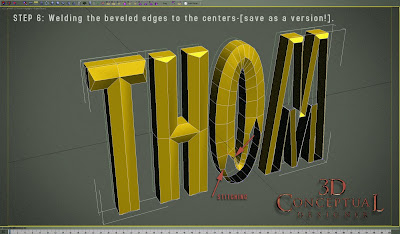
Stitching as I call it is the process of selecting the vertices that will be collapsed or welded together to create the point in this Single Pointed Bevel type treatment. This is the LONGEST stage, and depending on the font I have spent 80-90% of the time here.


STEP VII
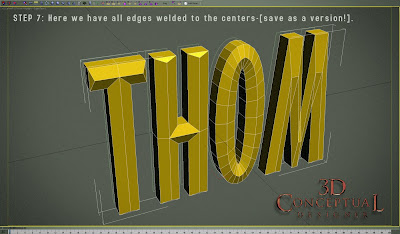
At this stage I put a quick smooth modifier to remove smoothing artifacts so I can clearly see the font and the bevels to make sure I did not miss anything.


STEP VIII
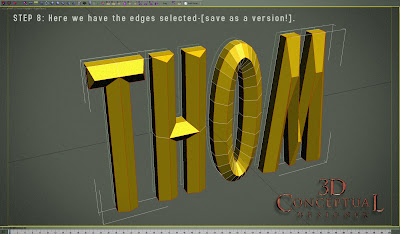
At this stage you select all edges that you want to have sharp as you will be doubling them up in STEP IV, with a small chamfered bevel.
NOTE: Save all steps but this one is vital as you will come back to this step to create multiple looks


STEP IV
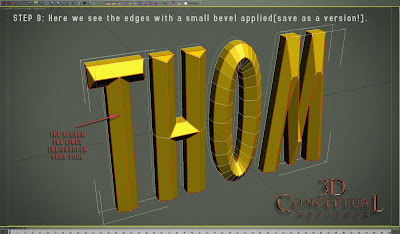
Adding the small bevel or chamfer to the edges desired to be sharp. This is the fasted step in adding bevel to the selected splines. Save as a version as well.


STEP X
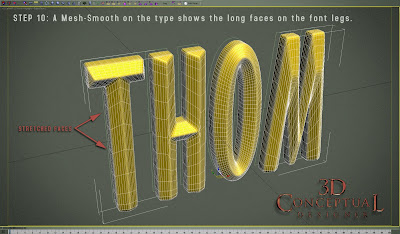
You put on a subdivision modifier like a Turbo-smooth or Mesh-Smooth to verify the bevels and that you did not miss a corner. If you did just go back two steps to the saved file and adjust.
Also at this stage we see the longer faces on the legs of the type as the smoothing is stitched out over some long faces, and with GI renderers needing square faces you will want to add in some extra polys next and remove the smooth for that.


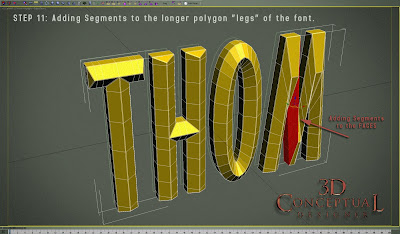
STEP XI
Cutting the polygons in the legs to have a few more divisions. I use the slice plane modifier under editable poly, but you can also chamfer the edges in the legs as well.


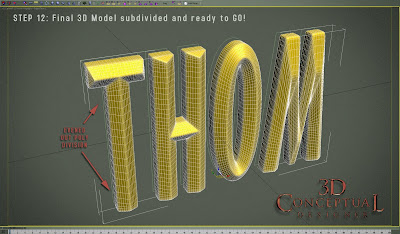
STEP XII
Here is the model smoothed with two iterations with everything done to have a simple single pointed beveled font with sharp sides like chiseled rock or metal.

Tutorial Tuesday
3D Logo Construction
How to Model a Single Point Bevel
Part I

Since I began doing 3D Logos for film and television back in 2000, I have seen a need for the Single Point Beveled [SPB] type treatment. As a user of 3DS max, I have always had both spline objects, as well as a great simple bevel modifier, built right into max that is super simple and easy to create a typical beveled and extruded text, but once the lines cross in the middle of the text face, there are issues with the geometry, as the program must cut the bevels to not cross over, and you get very problematic results.

My first hand modeled SPB, was done while at BLT and associates near the end of my 3 years there starting up their 3D department which is still going strong. I did that logo for the film, TROY. I built that title, that was animated by Matt Hartle for the trailers for the film. I was not a sub-D modeler at the time yet, so I built the type all high resolution since we flew through the font in the trailers so the rounds needed plenty of segmentation. Each letter took about an hour or so to model, but the technique I learned in this time intensive exercise created the groundwork for the Sub-D method I use now.

Above you can see the twelve steps involved with building a typical single point bevel. when you want the bevel to meet in the top center of the face, to a single point, thus having no real flat spot on top this method will work well with all fonts both serifed, and sans-serifed.

I will have additional tutorials in the weeks to come on various techniques I use to create in 3D, as well as some expansion on the SPB too.

Cheers, THOM


Tuesday, November 9, 2010

3D Techniques: Procedual Textures PART II: DarkTree and the Simbiont Max Plug-In

The Interface found in Darkling Simulations Dark-Tree Product. This is my Rough Concrete Material I built a few years back.


Inside 3DS max, this is what a Simbiont Max Material looks like with the various "tweaks" you define.

Here is a corroded bronze material I designed and built.

A scratched steel procedural material I built.


This is a combo of Procedural and Bitmaps for the metal scratches.


A highly corroded meal pitted and rusted out.


A Modified version of the Simbiont Max Pumice Material.

A pitted metal with some bitmapped scratches and GI and reflections blurred.

A very rusty material with dark corroded metal with adjustable rust areas based on fractal mathematics.


Dark Tree 3D Procedural Texture Creation

For almost 8 years now I have used a wonderful free-plug-in for 3DS max that is absolutely essential to have in your 3D toolkit.

Procedural Textures are mathematical formulas that create the patterns based on Fractal mathematics, and these are used to create extremely detailed textures for your 3D scenes. The advantages over bitmaps are multiple with the only real time crunching drawback being they take longer to render as they are created "at rendertime", so they are resolution independent. This means no stretching of maps or pixelation of photos, or baked in lightsource that all photos have.

If you use a "noise" or "Cellular" map these are procedurals. Darkling Simulations the makers of this wonderful plug-in also sell a program where you can build your own Procedural Texture files from scratch or start with their shipped textures and modify them with tweaks for your 3D program of choice called DarkTree. I purchased this program and use it regularly for any type of natural material looks with stone and iron being very powerful areas for procedurals.

If you have an interest in the free plug-ins they offer take a look at there site here.

I also posted a few added images using these methods for THE CORE, here.


Cheers, THOM

Monday, January 4, 2010

Why you are paying too much for your 3D:Part I

Why you are paying too much for your 3D:Part I


Architecture Analogy Answer-[ Design and building a house ]-
Because you hired a 3D Carpenter[ a modeler] to design your house, and though, he sure can swing that hammer like an expert, but since he has no training in architecture, he "missed a spot" is putting it lightly as to your final product. You hired the "Framer" to design, so expect a framers house. You get what you paid for, or over paid for at the end.

If you are tasking people with no 3D specific design training to design especially in 3D you will pay 5 to 10 times the cost over hiring a 3D Designer. Also 2D designers and Illustrators training is in 2D, and though they approach 3D very differently from a 3D Designer, they also lack training in 3D specific design, which will reveal problems with a 2D approach to 3D. This is why we end up with extruded text logos as the majority of "3D" in MGFX and titles.

Since most 3D Modelers have no design training, only training in the programs as to how to build, they know how to build things well, but they are not formally trained in the following so it will get very costly for you by the end of the project:

Automotive Design.
Product Design.
Environmental Design.
Typography Design.
Visual Communication [ Vis-Com]
Nature of Materials.
Automotive Aerodynamics.
Automotive Engineering.
Theory of Structure.
Woodworking.
Metalworking.
Construction.
Clay Modeling.
Foam Modeling.
Plastics and Manufacturing.
Mold making.
Metalsmithing.
Space Planning.
Thematic Design.
Set Design
Interior Design

If that list sounds like the curriculum at Art Center for a Transportation/Product/Environmental Designer, you are right!


Cheers, THOM

Thursday, December 10, 2009

What is a Finish?


What's a Finish?

This is a term used in Theatrical Advertising to indicate that the composition "Comp" you were designing or working on was picked as the final, and thus Finished, or will be printed.

I have attached a large JPG showing the posters I have been a part of the finish on. Why a part? Well as a 3D Illustrator I never do the whole poster myself, but work directly with a team of Creative Directors, Art Directors, and Designers to create the final poster. Sometimes it is just the logo like on Superman Returns, or everything except the talent, like the Night at the Museum comp where the Museum Hallway and everything in it is 3D except the talent.

Cheers, THOM

P.S. The Post title links to the best site for seeing Movie Posters the "Internet Movie Poster Awards" or IMPAwards.

You can look up any finish and get an enlargement on this site.
http://www.impawards.com/

Monday, November 30, 2009

Behind the Art: Herbie Fully Loaded


Behind the Art: Herbie-Fully Loaded

I am often asked where do I start with an automotive virtual image so I have this brief outline of what I do to create an image of a virtual photo-real car.

Design Phase:

I am professionally trained to design a car from scratch, but most often, I build existing automobiles.

Unless the manufacturer hands you 3D data, you need buy or create the virtual model yourself, and having been trained in automotive design is what I use in this step. I also have owned over 40 cars and over 15 have been VW's so I have personally restored and wrenched on a lot of VW's which gave me a great advantage with a head start for Herbie.
This step involves both knowing every part of the car itself, inside and out, and knowing how it is constructed, and as a trained Transportation designer this is what I do best.

Build [3D Modeling] Phase:

Getting a 3D Model made involving a scan will run around $25,000.oo-$50,000.oo for just the exterior, and about the same for an interior. This does not include the engine, suspension or undercarriage usually, but an indication of them. I build from scratch to scale and "On Model" for around $8,000.oo and up.

I build part by part and start with an accurate measurement of the car and block out the wheelbase and overall bounding box so proportions will be accurate. I then move to all pieces needed for the work at hand. I always work bigger parts to smaller ones.

Materials Phase

As I have down time, I practiced with all materials needed to render out a typical car. Most are straight forward with glass and paint taking the longest to perfect. I have used Pre-made shaders, and find most are limited so I build my own. I have a library of automotive shaders ready to go for setting up a photo shoot quickly.

For the Mitsubishi pitch I helped win at The Cimarron Group for The Traffic Agency, I had weeks of time perfecting metalic paints that when I had just 4 Hours to create images for an end of day pitch, I was able to deliver for under $1000.oo. with an online 3D Model form 3Do2.com

Virtual Photo shoot Phase

Setting up the virtual sound stage is a mirror of a real one. The techniques used are basically the same. A common misconception I have ran into is that clients sometimes think that you can buy a 3D model drop it into 3D program, hit render, and it is done. That would be like you going to Hertz renting a car driving on to a soundstage and taking a picture with your Casio for a photospread for a client. You would be fired! All automotive manufacturers use professional photographers for a reason, and virtual photography is it's best when you are consulting a professional photographer[ best thing I ever did RE: 3D cars!]

Rendering Phase

Once you have set it all up the computer calculates the lighting and materials on the geometry and renders out the image or movie sequence you have set up. Smart 3D allows for any image to be rendered out larger with exact contitions from the first, as if the photo shoot was perpetual.

Retouching Phase

Every car image you see in print is retouched. The art of retouching itself is a very specialized field and even vendor to vendor there are certain "techniques" that will be in all products from each manufacturer. As a virtual Image I give the Smart 3D channels and masks, so the time factor for retouching is always less expensive.


Cheers, THOM

Friday, November 20, 2009

How big is the market for 3D goods and services?

3D Conceptual Design Market Breakdown

This following list illustrates the great potential that 3D design has, and will have in the near future in a broad array of business ventures on an international level.
3D Designers will be the central player in these type of products and services.
So, "How big is the market for 3D goods and services?", HUGE!


1. 3D Model sales.
-A. Stock Model sales.
--aa. TurboSquid.com
--bb. 3D02.com [ selling on a second main site]
--cc. 3dconceptualdesigner.com [ setting up our own sales system online for 100% profit]
-B. Custom Model Sales.
--aa. For the market of Advertising.
--bb. For the market of the Medical Industry.
--cc. For the Education Market.
--dd. For the Product Design Market.
----I. IDSA. [Industrial Design Society of America]
--ee. For the Entertainment Industry Market.
----I. Cinefex Magazine.
----II. AD Week.
----III. FVX online site advertising.[CG-talk, VFX-pro, et all]

2. 3D Design Illustration.
-A. Advertising Illustration.
--aa. Traditional Corporate Agencies.
----I. In USA. [ New York, Boston, Chicago et all.]
----II. International Agencies.
--bb. Entertainment AD Agencies.
----I. Cimarron group, BLT, et. All.
----II. In-House Advertising from the Studios. [WB, Fox, DreamWorks, et. all]
-B. Medical Illustration.
--aa. Pharmaceutical Manufacturers.
--bb. Hospitals.[ County, City of Hope, Private, et all]
--cc. University.[ UCLA, USC, et all]
--dd. Private Practitioner.[ Doctors, Dentists, Chiropractic, et all]
-C. Packaging Illustration.
--aa. Toy Manufacturers.[Mattel, McFarlane Toys, Playskool, Disney, et all]
--bb. Consumer Electronic Manufacturers.[Sony, Panasonic, Mitsubishi, et all]
--cc. Cosmetics Manufacturers.[Revlon, Avon, Mary Kay et all]
--dd. Tools and Hardware.[Proto, Craftsman, Maco, et all ]
--ee. Food and Drink Companies.[ Kraft, Whole Food, Trader Joes, et all]
-D. Technical Illustration.
--aa. Industrial Manufacturing Clients.
----I. Professional and Trade[internal procedure, safety, repair].
----II. Public interaction.[manuals, help, training etc.]
--bb. Electronics Manufacturing Clients.
----I. Professional and Trade[internal procedure, safety, repair].
----II. Public interaction.[manuals, help, training etc.]
--cc. Software Creation Clients.
----I. Public interaction.[manuals, help, training etc.]

3. 3D Architectural Pre-Viz.
-A. 3D Illustration.
--aa. For City and County Permits.
--bb. For Investor Presentations.
--cc. For Marketing.
--dd. For client Design analysis.
-B. 3D Fly-thru.
--aa. For Design Presentations.
-C. 3D Sunlight, Reflection, and Line of sight studies.
--aa. For client design analysis.
--bb. For Public Relations to City and Neighbors.

4. 3D Motion Graphics Design.
-A. Animated Title Cards.
--aa. For Television Clients.
--bb. For Film Clients.
--cc. For Online Clients.
--dd. For Mobile Media Clients.
B. Animated Visual Effects.
--aa. For Television Clients.
--bb. For Film Clients.
--cc. For Online Clients.
--dd. For Mobile Media Clients.
C. Full CGI Animated Scenes.
--aa. For Television Clients.
--bb. For Film Clients.
--cc. For Online Clients.
--dd. For Mobile Media Clients.

5. 3D Animation Design.[ Character].
-A. Animation Properties.
--aa. For BIG Studios.[Pixar, Blue Sky, Disney, DreamWorks, Sony, et. All.]
--bb. For Medium studios, Blur etc.
-B. Animated Corporate Mascots.
--aa. For Internal Business use.[employee and client]
----I. For corporate intranet.
----II. For Presentations.
----III. For client relations
--bb. For external business use [public]
----I. Mascot Design. [ ala. Geiko’s Gecko]
----II. For Software [ala. The Microsoft Paperclip Helper]

6. 3D Product Design.
-A. Toy Design.
--aa. Pre-Viz Designs.
----I. For Manufacturer. [ Mattel et all.]
----II. For Independent Designer/ Design Firm.
--bb. Model to Part for Product.
-B. Consumer Product Design.
--aa. Pre-Viz Designs.
----I. For Manufacturer. [ Sony, Apple, et all.]
----II. For Independent Designer/ Design Firm.
--bb. Model to Part for Production.
-C. Transportation Design.
--aa. Automotive Clients.
----I. Smaller manufacturers.[ Smart, Tesela, et all].
----II. Larger Clients sub-contracted.[ GM, Honda, Ferrari et all]
--bb. Motorcycle Clients.
----I. Motorcycle Manufacturers. [Harley, Triumph, Honda, Ducati, et all]
----II. Parts Manufacturers.[aftermarket]
--cc. Bicycling Clients.
----I. Bike Manufacturers.[Schwinn, Trek, et all’
----II. Parts Manufacturers.[aftermarket]
--dd. Yacht Clients.
----I. Yacht and Powerboat Manufacturers.
----II. Parts Manufacturers.[aftermarket]
--ee. Aerospace Clients.
----I. Airplane Manufacturers. [Boeing et all]
----II. Space Flight and Satellite Manufacturers. [NASA, JPL, Northrop et all]
-D. Military Design.
--aa. US Government.
--bb. International Clients.

7. 3D Web Design.
-A. 3D Interface Design.
--aa. Illustrations and movies for use.
--bb. User Interface for use .[UI]
-B. Full 3D Immersive web page design.
--aa. Virtual Spaces.
--bb. Animated Movies.

8. 3D Interactive Design.
-A. Entertainment CD/DVD design.
--aa. Video Game Market.
----I. Console Games.
----II. PC Games.
----III. Online Games.
----IV. Phone Games.
-B. Edutainment CD/DVD design.
--aa. Publishing Houses.
--bb. Universities.
--cc. Foundations.
--dd. Church and Synagogue.
-C. Traditional Educational CD/DVD design.
--aa. Publishing Houses.
--bb. Universities.
--cc. Foundations.
--dd. Church and Synagogue.
-D. Medical Training CD/DVD design.
--aa. Publishing Houses.
--bb. Universities.
--cc. Hospitals.
--dd. Private Practitioners.
----I. Doctors.
----II. Dentists.
--ee. Pharmaceutical Companies.
----I. For Pharmacists.
----II. For Doctors.
----III. For Patients.
-E. Industrial and Trade CD/DVD design.
--aa. Industrial Manufacturing.
----I. Training.
----II. Safety. [O.S.H.A. et all ]

9. 3D Effects Movie Sales.
-A. Stock VFX Sales.
--aa. “Art-Beats” type of licensed stock library sales.
--bb. Online asset sales.
-B. Custom VFX frames sales.
--aa. Client specific designs bought outright.

10. 3D Training.
-A. Online 3D Training.
--aa. Schools.[ Art Center, Gnomon, Otis, Cal Arts]
--bb. Corporations.
--cc. Peers and Societies. [CG-talk, 3D Total, et all]
-B. Published 3D Training.
--aa. Schools.
--bb. Corporations.
--cc. Peers and Societies. [Walden, Doubleday, et all]
-C. Classroom 3D Training.
--aa. Schools.
--bb. Corporations.
--cc. Peers and Societies. [SIGGRAPH et all]

Cheers, THOM

Thursday, November 19, 2009

All 3D Designers are 3D Artists, BUT not all 3D Artists are 3D Designers.

I am asked this constantly, "What is the difference between a 3D Artist, and 3D Designer?"

In the past I have regularly spoken to classes of students in both High Schools and College, and I begin with a simple delineation that was made clear while attending both C.C.S. in Detroit, and A.C.C.D. in Pasadena, namely what is the difference between Design and Illustration?

Simplified down to start, the difference is do you like to draw what you see in front of you, or from your head?

Obviously there is cross over , but an illustrators training is in still life, composition, and figurative work. Whereas a Designer is trained in Ergonomics, Theory of Structure, Automotive Engineering, Aerodynamics, Basic Construction, Manufacturing, Mold making, Sculpting, Woodworking, metalworking, etc. The same analogy applys in the world of 3D.

Another major difference between an Illustrator and a Designer is that the flat artwork of the Illustrator or painter, IS the product itself and an end, where as to the designer, say an architect, the plans POINT to the actual design which happens to be a house, the artwork being 2D or 3D is a means to an end so the emphasis is on the design itself not always the illustration.

Why is this such a big difference? Well if an illustrator paints a great concept that looks great, but the door hits the wall and will not open as a functioning design it FAILED as a design solution,but may very well be an amazing painted piece of artwork and be fine. An illustrator in neither trained or always concerned about actual function of products in an illustration[ artistic license] as the painting itself is the final product, since the artwork is the product.

As a 3D Designer I always design two things, first the idea or product itself, and second how it is to be made or built. While designing I am figuring out how to build it so my sketches reflect an accuracy that a painter can miss. This is where the saving is for a clients budget!

As a 3D Designer, if I design something great, BUT it cannot be made I FAILED. I must consider this during the design and sketching stage, whereas an illustrator is painting a cool picture and with most it ends there.

All 3D Designers are 3D Artists, BUT not all 3D Artists are 3D Designers.

"Knowing how to use a table saw and cut wood does not make you an Architect!"


Cheers, THOM
Wednesday, November 18, 2009

3DS r4 DOS!


I have been with 3D Studio since day one that I started with 3D in 1994. I miss the "Dongle" approach to authorizing max as it is so much easier to do[ see photo ]. Max has come a long way!


Cheers, THOM


Link in Post tile goes to history of 3D Studio, or paste in test:
http://www.asterius.com/atari/index.html

Friday, November 6, 2009

Talent Comes Last!

TALENT IS LAST

As a graduate of Art Center in Pasadena California, I was privileged to be in the presence of the the most talented artists from around the world, working side by side for many years, yet as I look back at my education and the various Art Director positions I have held, I came up with a list in my head that I used to pick what is referred to as "talent".

I have had discussions with fellow Designers and Directors and all seem to match up to what I have concluded, namely that in a production environment, "Talent is Last".
__________________________________________________________________
The list is short and goes like this:

First- Work Ethic: Are you a hard worker or just doing the minimum?

Second-Do you take direction well, namely are you able to take a critique and are you teachable.

Third- How well do you work with others, specifically with a team.

Fourth- Talent.
__________________________________________________________________

If you work hard, but don't work well with others, it is of no consequence how talented you are if I have to fix your work, or wait forever to finally get it from you.

If I can't Art direct your work, you are useless to a team, especially the Art Director.

If you suffer from "Freelanceitis" where you have worked alone so long that you are difficult to fit into existing production models[ read: flawed], you become a liability to the production budget and schedule and all the talent in the world will not fix that.

If you do great work and take my direction, but every time I turn around you are on eBay, you become a deficit to the production and myself and others end up picking up after you.

This isn't professional sports where you see the "Talent" run rampant with lack of work ethic, unwilling to work with others , and a lack of teach ability.

If you lack the talent or skills that others around you have, keep working hard and remain teachable, and soon you will find that your ability is growing, and in many cases you will pass the naturally talented obnoxious slackers that we all know.

If you currently employ a "prima donna", and your budgets are destroyed , look no further as to the fixing and work arounds that everybody is forced to do around that person, and in this economy that is just Bad Business.

Cheers, THOM

Wednesday, November 4, 2009

Who is your Advocate at Work?


A great Line Producer once told me "The Fish Stinks from the Head Down", which has shown itself to be a great truth in the business world, especially the way we as artists get treated or should I say, mistreated. This reminds me of how important it is to have an advocate as close to the head of a company as possible.

Having reconnected to a few of my prior employers these last few months, I realize who really "got" what I do as a 3D Conceptual Designer, and who was my advocate helping me do what I do best. Those that have been great advocates of what I do are the best thing to being successful for both parties, and those who both do not understand 3D, and don't back you up are the worst for all involved.

Having friends in high places is something everyone wants in business, yet as artists who tend for the most part to be worker bees, they need this advocate more then some know. Someone with a say in the way things are run[ empowered]and having power is the class of person that must be your advocate. You want to go as high as you can in the structure to get as close to the true "head" of a company. Sometimes it is the owner, and sometimes it is a Producer or Creative Director, but no matter who it is they must be someone who can argue on your behalf.

And a word of caution: If your advocate is a devil, their bad reputation will get passed along with you, so pick carefully. Whomever you do pick, make sure to thank them for backing you up, and let them know what they really are doing for you.

Cheers, THOM

P.S. A great film if you have not seen it yet.

Tuesday, November 3, 2009

You need a PIT CREW!


FLYING SOLO


Too many 3D artists take for granted the need for good "tech" support. In fact many companies do not see how essential they are to us as 3D designers, and Animators. 3D software will bend and break your hardware like no 2D program even comes close to stretching the limits on. 3D is on the cutting edge and the software that you use must run good to get the most out of it.

I have long used the Race Car Driver analogy, as we 3D Artists are the drivers, and without good support from a team, we cannot win our races. A good PIT CREW is essential. Funny how many companies lower the importance of I.T. Services, since there is no glamor to the job, as most of it is not seen when things are good, but ALWAYS visible when something does not work. It is a tough job to do with little or no glory as we artists get "bathed in" on a daily basis showing off what we do to others on a regular basis.

If you have a good Pit crew with IT support, make sure you THANK THEM! They make you drive faster and win your races. It is one thing when the owner does not see this, but very different if you the 3D artist takes them for granted. Once you loose a good crew, you definately feel the pain, and you need to be their biggest advocate!


Cheers, THOM

Monday, November 2, 2009

TERMS USED ON THIS SITE DEFINED

Terms Used and Defined on this Site

3D:
Short for Three Dimensional, referring to the building of a geometric model in virtual space and not a 2D, or Two dimensional flat drawing or computer graphic.

Computer Generated Image [CGI]:
An Image that is rendered in a computer program and output as a single image or a sequence of images to create a movie, both are referred to as CGI. The term in context is compared to an image not created using a computer.

3D Designer:
A designer specifically trained in three dimensional thinking and design and not merely a 3D program user. A 3D Designer thinks in volumes and dimensions rather than flat shapes alone. If they are trained in Industrial Design with an understand of, manufacturing, construction, and basic engineering they will be that much more efficient as a dimensional designer.

3D Model:
The geometric objects built out in a 3D program that are rendered out to produce the CGI needed for print, Web or AV use.

3D Illustration:
Some call it virtual photography but it is all the same, namely a still image rendered out and used to illustrate a real or imaginary object, effect, world, space, or creature. It can be photo real or stylized.

3D Animation:
Is moving 3D objects, lights, cameras or characters in a virtual space and having that rendered sequence output for viewing.

Rendering:
This is the process when the 3D program calculates everything that the 3D Designer has set up in the Virtual scene on the computer and draws out an image from a point of view[ usually a camera] in the 3D space. A still image usually is a single rendering but many times is done in separate passes for future adjustments, and an animation is rendering out in as many frames as are needed in the animation length. Rendering involves the materials, environments, and lighting of the 3D models in the scene.

Photo Real:
A term used to describe a specific visual look for a 3D illustration or rendered animation as looking as close to real as possible. Photo Real is the most time consuming and difficult of all 3D rendering tasks and takes years to master.

Render Farm:
This a series of computers set up specifically to calculate and help render out the images from the 3D program. I use both an internal Renderfarm for small to medium jobs, and use an external Renderfarm with well over 800 PC’s for my larger jobs, or those that require a very rapid turn around.

Cheers, THOM

Saturday, October 31, 2009

SMART 3D


What is Smart 3D?

-Smart 3D describes the multiple advantages that a 3D render offers when used as virtual photography, over against the two traditional means used in actual photography, namely that of Stock Photography, and doing a custom photo shoot with a staff Photographer.

-Every advertising agency is using both the above photography solutions in their production for many decades, yet virtual photography has so many advantages, once the industry is properly educated to them they will shift over and use as much virtual photography as possible because the cost and time factors cannot be matched.

-What are these advantages to using a virtual photograph[ 3D Render] over a real Photo, you may ask. Well there are many as follows:

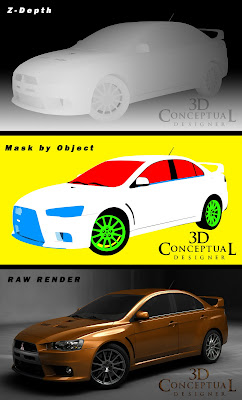
-First up is they are rendered with an alpha channel so cutting them off the background is instant, vs. the hand masking that for larger images takes many hours for each mask. This cost savings is not readily connected to the 3D asset, but any finisher or retoucher that has used the SMART 3D image knows full well they can spend more time on the art, and every producer sees less money being spent by high dollar artists doing masks.

-Second, besides a general alpha channel to cut out the 3D object, you can ask for a channel mask for as many objects or surfaces as needed. In the above example the retoucher asked for the glass, paint, and chrome to have a channel mask made, and that along with the other channels provided, this cut the retouchting time to 25% of a normal photographed car. Saving 75% on retouching in this economy is a make or break situation for many companies trying to cut costs.

-Third as explained in a prior post the Z-Depth channel, gives dimensional pixel information for artistic staging and effects applied to the "virtual Photograph".

-Fourth, when using stock photos there is usually some kind of schedule to buy out the image or paying for each use, that with a custom built SMART 3D asset, is eliminated as you own the image outright.

-Fifth, the SMART 3D asset is saved out as a live stage. Image a photo shoot that is never taken down or the lights moved forever. This in essence is what you get with a virtual photo shoot. You can go back and produce more masks in the exact position as the original image has.

-And Finally, the render itself can be output with components of a single render output on separate layers like the shadows and reflections. High dollar artists spend hours "painting" out a shadow or reflection from a photograph to make it right for the job at hand, but with a SMART 3D asset , you merely delete the shadow layer or erase the section without changing the image below.

-3D Illustration is always thought of for a big shiny metal 3D extruded logo like I did for X-MEN, but for a generic shot of a chair, photography is the fall back position, and 3D does not usually come to mind for a "mundane" task. But, if you want to save time and money in your production by everyone who uses the image once the 3D Designer has handed off the work and is done, use a SMART 3D image. The savings of time and money stay with that image each time it is used.


Cheers, THOM

Friday, October 30, 2009

Common Misconceptions about 3D


Common Misconceptions about 3D

1. 3D is a tool to draw in perspective.
FALSE-This is a very common misunderstanding that 3D is akin to drawing in perspective which is an illusion of 3D done on a flat surface to simulate space. In 3D we build using three dimensional geometric objects in a 3D workspace like Cones, Boxes, Spheres, and Cylinders. We can look at the scene from any angle or perspective or simply a top view with no perspective whatsoever. Think of 3D like this: it is not drawing, but building. If you look at the above image I used a curvilinear perspective technique perfected by M.C. Escher to give the illustion of a wrapping perspective 360.

2. 3D requires those funny glasses.
FALSE- 3D stereoscopic is a film and print technique that allows the viewer to view a stereoscopic image from two angles simultaneously so that your eyes together produces a combined vision that it has depth to it. Though 3D geometric objects work great in a 3D Stereoscopic view since they already are truly 3D, they are used primarily in standard imagery, and most of what is seen as stereoscopic is converted film footage.

3. 3D is always the most expensive solution.
FALSE- 3D should not be considered “the be all, end all” tool to use. Some things in 3D are very expensive and if 3D is the only tool used then yes 3D can get expensive. 3D is merely a tool that has the ability to produce certain results very quickly which would be near impossible in any other medium, and when used properly can be more economical in the long run.

4. 3D takes a very long time.
FALSE- 3D can be very quick to set up and with my existing library of pre built models , I visit the “Virtual Home Depot” and put together a scene with existing parts in a rapid fashion.

Cheers, THOM

Wednesday, October 28, 2009

ETIQUETTE of the ART CRITIQUE

The Etiquette of the Art Critique

1. Never Critique without asking the artist first for permission, it is not your right unless you are personally paying them yourself. [ i.e you are the client].
2. Always aim the critique at the art not the artist, don’t get personal.
3. Frame your criticism in a constructive manner as you have a better chance in the artist hearing your criticism which should be the goal.
4. Be clear, and frame your comments in artistic terms rather than emotional terms that require interpretation.[ i.e. lighter or darker, not magical!]
5. Always keep in mind the time frame the artwork was done in so you are not criticizing a one day project with the standards of a month long one.
6. When entering a critique late ask what has been said so far as to not duplicate what has already been said.
7. Always have the artist repeat back what you have suggested to ensure that it was communicated correctly.
8. If you are not a professionally trained artist your chances of committing “foot in mouth” are drastically higher so leave the critiquing to the artists if at all possible for best results.
9. Be aware a critique is not a free for all, since anyone can give a critique, but not just anyone can give an accurate and proper informed one.
10. Be willing to be challenged in your critique as most comments contain some level of subjectiveness, and with some crit's, that is all they contain.

Cheers, THOM

I know, I know, IF ONLY!