Showing posts with label Automotive Rendering. Show all posts

Sunday, June 22, 2025

Project Review: NOS4A2 AMC Series- 3D Illustration of 1938 Rolls-Royce Wraith for Key Art 2019 - PART II


A Camera view straight on  the 1938 Rolls Royce Wraith built Skull Icon with all the bells and whistles. I added blood spatter and some aging along with dramatic lighting, which made this concept my favorite.


A Camera view straight on rendered out with out the blood spattering so it is clean so the client can rough it up the a level that they want too.


 A Lowered front Camera view that tipped the skull back so it was looking down at us. 3D illustration makes this a simple camera move and re-render, an economy of scale with tight budgets.


A 3/4 left Camera view shows some more depth in the build. Since multiple Art Directors are using these 3D Illustrations this gives them more options to pick from.


A 3/4 right side Camera view. I also used the Z-Depth pass to darken the lighting as the skull tipped back on the left to stage it better.


A elevated Camera view straight on looking down showing of the "chin" area below the radiator grill and those chrome strips on elevated sheet-metal gave a similar lighting like teeth sockets in the skull or the gums.


Another elevated Camera view tilled slightly, but I used a much shorter lens with the Cebas Final Render fish-eye camera instead.


A Camera view straight on in the Ambient/ Dirt shader render pass. I use this to add depth to the render by darkening geometry intersections. It also add a bit of roll to the lighting and material naturally found in real life.


A Camera view straight on screen grab in the Red Clay showing the Quad Subdivision Base Mesh


A Camera view straight on screen grab in the Red Clay showing the Subdivision set a 2.


Aclose front perspective view in the Red Clay showing more details in my build.


A 3/4 screen grab in the Red Clay shows the dimension as well as those fabulous horns taken from the classic car.


A 3/4 screen grab in the Red Clay showing that cool 'chin' just below the grill. it made great 'teeth' for the skull!


A 3/4 screen grab in the Red Clay close up shows the woven screen on the horns. I grabbed that from a microphone I built out in a prior project, and flattened it back out, as I saved it flat for this reason for later use.

 
A 3/4 screen grab in the Red Clay showing surface and dimension on the grill area


This screen grab shows the Hood ornament as a base mesh with out Sub-D added yet as the main character, Charlie Manx along with the Rolls Royce logo changed out to his initials to CM.


  A view-port material view screen grab shows that I did build out the interior inside the headlight buckets with bulb, reflector back that was properly fluted, and the bulb holders and internal filament too.


Project Review
NOS4A2 AMC Series
3D Illustration of 1938 Rolls-Royce Wraith
for Key Art 2019
PART II

Client:  AMC via Leroy and Rose
Creative Direction:  Melchior Lamy 
Project Date:  February 2019.


     I am now able to post more work that I did for Melchior at Leroy & Rose for some Key Art work for the AMC Series NOS4A2 [ a.k.a. Nosferatu ] I love working with L&R!

      This project was a really fun concept that I was given to take a classic 1938 Rolls-Royce Wraith front end and use the parts to emulate a human skull with the headlights as the eyes. It also has an old county fair Ferris wheel that made the round top of the skull.Everything except the Ferris wheel were built out in Quads for subdivision surfaces. 
 
     I also posted some Behind the Art images with some wireframes and Clay shader screen grabs showing the base poly mesh and the subdivided smoothed one above. I love the 'Jewelry', or shiny bits and details found on classic cars, take a look at my Instragram and you will see that I take a lot of close up shots on classics, so this love of mine translates over to my 3D builds.
 
    This project really showcases the power of using 3D assets for this type of work. It could have been a "Frankenstein-Comp" using Photoshop to piece it together bit by bit, but when you do it in 3D you have the benefit of rendering it again with different camera angles, lighting, textures, and even a unique camera lens with a fish-eye exaggerated views as shown in my images above. So one base 3D model at different angles with a variety of textures was possible with a single 3D build, and then rendered over and over. The first comp is where the time is mostly billed at, with the extra shots at a much quicker pace when the model is ready.
 
     My Global Illumination render plug-in of choice is Cebas Software Final Render, as it include extra cameras to have full control of the level of distortion so you get a true curved lens output in 3D.I highly recommend this software as a plug in for 3DSmax or Maya.

   As a Transportation designer I love all things automotive, so from the 3D Logo License Plate to actually building out classic car parts to put together into a really fun concept of a skull was super cool, and a rare type of gig I get. Also as a huge Horror fan the concept was a privilege to do this work.

You can view PART-I here. The License Plate 3D Logo that made it to finish, and was also used on the new reprints of the novel Book Cover as well.

     If you need a bid for a 3D Illustration or 3D Logo , or a 3D Model feel free to contact me for a quote. I am open to Hourly gig's , Work Retainers , Part-time , and Full Time opportunities [ Open to relocation ]. I have worked remote since 2009, so I am ready to go, but I would prefer an in-house team.

                                 Cheers, THOM

Tuesday, December 15, 2020

Personal Project: Volksrod- Vintage VW Bug Hot Rod Project PART II - Work In Progress 3D Rendering Exterior

 Low angle 3/4 Side view of my Volksrod. You can see the Ribbed Semaphore signal out in this render as well.

  Low angle 3/4 Back view of my Volksrod. You can see Kafer bar as well as the Vintage Hella Brake Lights with Rock guards.

  Low angle 3/4 Passenger Side view of my Volksrod. The re'pop 20" and 22" wire wheels really give it a good stance at this angle IMO.

  Low angle Front View of my Volksrod. You can see the partial beam in the refection I added in recently here as well as the new "face" with lighting changes.

  Bird's Eye View of my Volksrod.

  Low angle 3/4 Side-Front view of my Volksrod. You can see the performance pasts under the engine and trans-axle as well as the new jack points in this shot.

  A direct Side View profile on the Volksrod concept.


Personal Project
Volksrod
Vintage VW Bug Hot Rod Project 
PART II - Work In Progress 3D Rendering Exterior


Personal Project:  Volksrod- Vintage VW Hot Rod Salt Flat Inspired Custom


      This post is my second in a series on  my personal Volksrod project [ Vintage VW Hotrod]. This post is also a Work in Progress [WIP=Work in Progress] post too, so even thought I am near done with the exterior as well as many updates on the twin supercharged motor, I have yet to fully address the interior and I am still using the Herbie stock '63  parts inside for now I built many years back for the Advertising for Herbie Fully Loaded.

     I have moved into full colored renders for a few months as I finesse and continue to model, and I have spent most of my time on this Tuxedo black and chrome version. Also, I have spent a lot of time fine tuning the body parts as well as adding in details for placeholder objects from the earlier build as I did start with the 1963 Herbie I made and wanted more accurate parts.

      In my continued 3D Modeling in 3DS Max, I have focused primarily on the seen exterior, but I have also revised a lot underneath in both the front and rear suspension areas that are not fully seen in many shots but they are made more accurate for the real build at some future point in life. 

     On the front end, I rebuilt the Pan head where the torsion bar front suspension attaches to it, so I could mock up how the Ford Deuce rails would attach in there, and added some proposed bracing and attachment points. I also rebuilt the back Trans-axle Horns on the rear pan, as the Herbie mock up was not quite accurate enough to add in the Solid Mounts for the Trans-axle I also added. 

     Also while under there I added some Vintage performance parts, including a Modified 356 Porsche dual leaf-spring Camber commentator on the Swing Axle, as well as a Engine bar or "Kafer" racing bar on the engine itself. You will also see a vintage Gene Berg Oil sump in there now as well underneath.

    Since my last post I rebuilt the engine from the 40HP stock Herbie placeholder I had in there with a high displacement [ 2332cc] adding a proper fully equal length merged with stinger[must have!]exhaust system, along with adding in Dual AMR 500 Superchargers with a custom belt system with a custom center mount fan shroud.

     I fine tuned a lot of areas on the body smoothed out the top curve, the rear quarter window, and front quarter panel and added in the Zwitter crotch-coolers. I rebuilt the jack points more accurately, and adjusted the inner fender well louvered panels out front to line up better on the pan. I also took off the headlight eye brows and added 356 Porsche styled headlight grills with matching Hella fog lights with grills below them now. I also used that fog lamp build to add in taillights out back with grills as well.

     I also cut into the B-Pillar and added in early Ribbed type Semaphore turn signal arms into the build. I had to chop those a bit as they will need to be shortened for the real life build I plan in the future too. I love Semaphores, a must have on the build and the ribbed versions are available as reproductions so they are available along with most Split sheet metal from Europe.

     If interested , I run a Vintage VW's Chop Top group on Facebook for all types of VW chop Top cars, there is a permanent link on the side bar, and you can click here as well as it has some earlier renders in raw steel I did too HERE.

     Look for more posts as I continue with this personal project on the interior next with Porsche Speedster 356 seats on deck next.
 
     If you have a 3D Design , 3D Modeling, or 3D Animation needs on a  freelance basis, I am set up and and ready to go as I have been a remote studio for over a decade. All referrals are highly appreciated!

You can view PART I here.


        Cheers, THOM

Monday, May 4, 2020

Personal Project: Volksrod- Vintage VW Bug Hot Rod Project - Work In Progress 3D Modeling PART I


 Volksrod Work in Progress 
3/4 Front shot shows the custom extended headlight buckets with 60's Peanut signal light on top.

Plan View directly from above shows the overall proportion of the chop. About 7" chop so quite a "Mail Slot" look, as I want that Bonneville Flats feel the Volksrod.

  Low Side View on the Cyclorama background stage gives a nice grounding to the blocking model with a simple dark surface with a lightly blurred reflective shader from Cebas Final Renders SE product.

  This underside view shows that the majority of parts have been blocked out. I recently rebuilt the rear trailing arms to be from an early 1957 VW, so all parts were modified from the Herbie blocking used earlier.

  Low Front view is one of my favorites I rebuilt the hood to add in the 54 louvers as well as adding a Safari windshield.

 
 Low Angle 3/4 Rear shot showcasing the newly built Early form 18" front , and 20" rear 30's styled Raw Steel Wire wheels and Pie Crust tires I plan to use.

 A High Birds Eye view a bit over the front louvered hood and Early Ford I-Beam front end.[taken from this model here]
Note: I will use a second set of doors to get the quarter windows to roll down using all stock mechanics, though they will be a 1-piece widow conversion and not have chopped vent wings like in the doors.


 A Birds Eye elevated Side view. Remember this is still a WIP[Work In Progress] so there is massaging of the virtual metal work to remove flat spots[ tops of door frames] and fix up the panel gaps[ Hood to front cowl] etc.

 A 3/4 view of the Side and Back showing the newly grafted in Split Window section and louvered Deck-lid. 
NOTE: the stock single 40HP engine in there is a placeholder for now , as I figure out the mill specs: Dual 48 IDA's , or maybe a DLI Supercharger, etc.


Personal Project
Volksrod
Vintage VW Bug Hot Rod Project 
PART I - Work In Progress 3D Modeling


     I have a few automotive personal projects I have tinkered with over the years along with many Business Automotive work. Being a Gear Head, and graduate from Art Center in the Transportation Design program I thoroughly love all things automotive, especially old cars and Hot Rods. Those who know me , know my passion for Vintage VW's as well. Having owned many cars with over a dozen being vintage VW's the subject matter is one that is very easy to get onboard with.

Link to Super Sized Image above is here on CG Society.


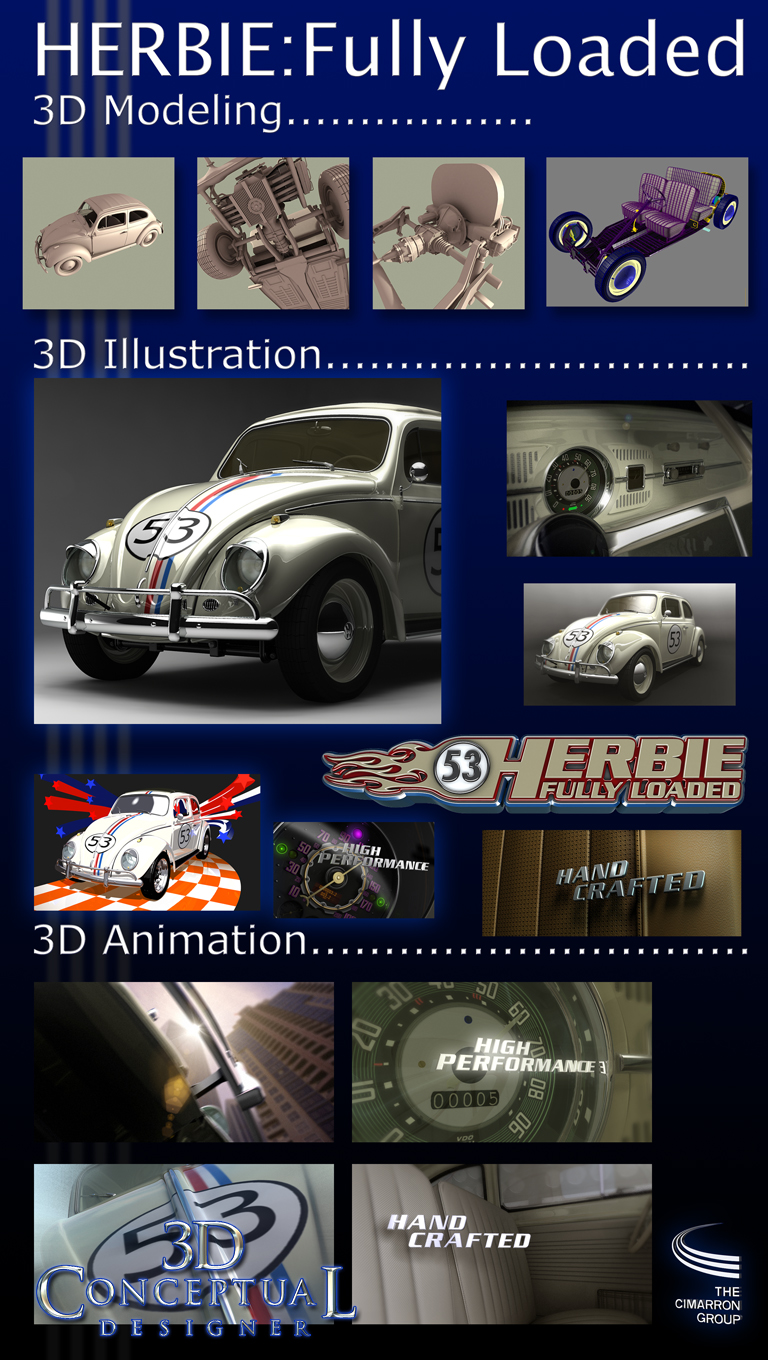
     Recently with the Covid-19 shutting down so much business, I have had too much free time , so when not looking for work, I am tinkering on my ongoing Volksrod project. A bit of history; I built a 3D VW bug [ 1963 Type 1]for the Herbie film 'Herbie Fully Loaded" while I was working as 3D Design Director at The Cimarron Group in Hollywood back in 2004. This was the first full model with interior and exterior as well as undercarriage and suspension I built. Since this model was rendered with cartoon shaders and used for both Print Posters , and 3D Animations in the TV Commercial spots it needed to have more than just the exterior skin built. 

 My 3D Herbie Fully Loaded work from a while back.

     I have since used this 3D VW model for two custom automotive projects, the first being my Bugster, which is a combination of a Porsche Speedster [ which I have also built in 3D here ] , and a Chop Top similar to the coach-built  Volkswagen Type 14A (commonly known as the Hebmüller Cabriolet of the late 40's. You can view PART I here , and PART II here.  The second is what I have posted today, the Volksrod.


 Bugster Custom VW
Hebmüller'esque with 356 Porsche parts.

     For those unfamiliar, Volksrods are a branch of the custom VW world that take their queues from the traditional Hot Rod world of the 1950's and onward. Similar to a Deuce Coupe, the cars are stripped of fenders customized with a Chop Top, or a Channeled Frame, and a sectioned body or a combo thereof. As with Hot Rods , you can find some are are High End customs , all the way to Garage "Rat Rods" some unfinished for life.

    This post is a WIP [ Work in Progress], so the work has many hours left on it. A few years back , I uploaded a short introduction video showing progress,and since then I have doubled my time into this personal project. 

     The purpose is to virtually build out the car prior to building one in real life , so I can work out the details before cutting begins. Think of this like a 3D Blueprint for the builder.

     If interested , I run a Vintage VW's Chop Top group on Facebook for all types of VW chop Top cars, there is a permanent link on the side bar, and you can click here as well.

Look for more posts as I continue with this personal project.
 
     If you have a 3D Design , Modeling, or Animation need Freelance, Part Time or Full-Time I am set up and and ready to go as I have been a remote studio for over a decade. All referrals are highly appreciated!


        Cheers, THOM

Thursday, September 28, 2017

Transportation [Car Design] 3D Rendering, Design, and 3D Printing for Automotive


A Sample of my 3D rendered Car Designs and Illustrations.

Transportation [Car Design]
3D Rendering, 3D Design, and 3D Printing for Automotive

Automotive design is what I was trained in at both CCS in Detroit, and finished up at Art Center in Pasadena California with a Degree in Transportation Design Fall of 1991. My first few jobs were sketching Car commercial mood boards and storyboard frames out of school, a typical path for many aspiring Entertainment Design seeking Transportation Design majors going into work in Hollywood. I worked on a dozen or so commercials in 2D for Mitsubishi, Chrysler, Lexus, Cadillac, Lincoln, Ford, and others. The directors liked to hire car majors as we were specifically trained to get the product right, the car. so we also ended up developing the futuristic set designs behind the cars as well as most of us were all Science Fiction geeks as well.

As time went on the development of 3D rendering has become photo realistic, with over 90% of the television and print work you see is actually not photography any longer, but 3D rendering of a Digital or Virtual Car.  For 3D Automotive work I have worked on Lotus, Mitsubishi[ again], Honda, Hyundai, Smart Car US, and a few others.

I have been working on virtual cars since my first full car in 3D back in 2003 for a pitch we made at The Cimarron Group to Lotus for the US launch of the Elise. At the time the cars were not in the US, though they did the show circuit and were at an LA auto show. I found a full set of pictures online as well as a blueprint for basic dimensions and proceeded to hand built the car from scratch in 3D.

As an advanced surface artist, 3D modeling a car was a virtual version of working in clay,. only the speed was much faster. A clay model was about 200 hours or work to finish, and I build out the full exterior of the Lotus in about 50 Hours. Mirroring objects that is available in 3D allows for perfect symmetry and you basically build half the car at a time and then modify each side for side specific details.

I have built my favorite car as well, a Vintage Volkswagen Bug for the rebooting of the Herbie franchise for Disney and got to build a 1963 Rag Top bug, from every part inside out and x-ray. This was used in the advertisements on TV and trailers in theaters.

Some clients like Honda wisely provide the model to you, so your time is spent dialing in the materials and lighting of the car. For this part a fellow ACCD grad and I were honored to visit a ACCD Grad Jerry Garns a master at automotive lighting, and translated his studio lighting into our 3D world.

My most recent adventure in 3D Transportation work and been to build out a full 3D asset for 3D Printing of a 1937 Sterling-J Pre War semi truck. The truck is currently being constructed out is Northern California, and I can't wait to see the final results.

 I have added a button on the right to quickly reference this in the future.

If you need a visualization or a 3D Model build or a piece of transportation design please contact me.

Cheers, THOM

NOTE: Blogger is limiting Image Size, a full size detailed image can be seen at this link.

Thursday, April 16, 2015

Project Review: Chevelle Race Car Paint Concepts: 3D Visualization-2014


Here is the first test render once I had built out the new parts for the stock Chevelle I used to Pre-Visualize the new looks.

 Here is an ambient render showing [in-red] what I rebuilt to match the existing bodywork on this race-car.

The Ambient 3D Render of the Racecar with Subdivision added[ Medium Rez].

The Low Poly Quad Mesh of the race car.

The first Idea was an Oilve-Drab Military Flying Tiger look for this race Chevelle.

I played with some simple color changes to see it in Tuxedo black.

A Deep Metallic Blue Paint job that was used to experiment with, with some lower two-tone graphics.

I did a few graphics that showed motion and heat as in a re-entry feel from space.

The second 'blue-car' concept was more angled ghosting the lines all the way back into a deep purple.

An alternate with thinner lines.

 Here is the last delivered file that had the paint flaking off from the heat going all the way back to the rear spoiler.


Project Review
3D Visualization
Chevelle Race Car Paint Concepts-2014

Client: Vince Thomas.
Art Direction: Myself.
Project Date: April 30th, 2014.

About a year back now, I was asked to visualize a few ideas for a paint scheme for a Chevelle Race Car out here in Colorado, and so the first task was to see if an exisitng 3D stock model was availalbe to start with. 

I found one, and my client bought it for the project,and I went and modified it to match the Race car he had, so I built out a new hood, rear spoiler, the rims and rear slicks, as well as the custom hood scoop.

Once I was done with the 3D Modeling stage I dropped it into my 3D Car Cyclorama Virtual Sound stage that I use for cars and began to Pre-Light the virtual shot.

I always start with where we are at at the front end of a project, so I did a test render in Silver to show the geometry was good to go for the color ideas to follow.

I was given some directions to follow along, but was also given creative freedom to experiment a bit as well. A fun 3/4 day gig.

Cheers, THOM