Showing posts with label Steampunk. Show all posts

Thursday, March 26, 2015

Project Review: Menagerie Creative-Steampunk Flying Machine Icon Design 2009-2011 PART II

A 3/4 front view on the final iteration on this Steampunk Flying Machine I designed and built in 3D.

The Polygon Ambient render with wireframe overlay shows the build out of the ship.

 A close Up on the Captains cabin out front on the steampunk vehicle.

The Polygon Quad Render.

 A 3/4 back view near the tail fans on this Steam Punk Floating contraption, as a fully rendered frame with Depth of Field added to the camera.

The Polygon build out render at that same angle.

A low side view into the main body thru the large glass windows.

Low side in Poly.

A full side view 3D Render of the main body nose to tail here.

The Wire frame shows the complexity in the build and reveals the bump map fakes.

 A Parts exploded view showing the individual designs.

 Here is a close-up on the exploded view showing 6the main nose cab details.


Project Review
Menagerie Creative 
Flying Machine Icon Design
2009-2011 PART II


Client: Menagerie Creative.
Creative Director: Cheryl Savala.
Project Date: November 2009.

Today in PART II I am covering a bit more details with alternate views of the flying machine I designed in 3D for Menagerie Creative a few years back. I did quite a few projects for them both for outside Entertainment clients, and directly for them as the client like this one.

I love steampunk design, as I am a vintage and antique collector so I love to imagine using only old-Tech to create modern machines, so this was a great project to get on and apply that to.

Flying Mythical Vehicles are so much fun. I only get to do this type of work once a decade or so, so when they do come onto my plate, I go all in.

Check out the Steampunk flying giant Flea I did in 2D and executed in 3D here as an example.

A very fun design to work on, and if you want to review PART I you can see that here.


Cheers, THOM

Friday, March 21, 2014

3D Stock Model Build Review: Vintage Subway Traincar built for online sales 2005.

I built out this turn of the century train car typical on the East Coast for online stock 3D model sales almost a decade back now.


A rendered version of the traincar at 2.5 Million faces this is a detailed exterior 3D asset


 I built out the ends with great detail for virtual photo shoot use.


 The rendering of the Subway Train shows all the 1000's of rivets I hand placed all over the metal body.


 A Doorway detailed shot shows the roof gutter and threshold riveted on.


 A renders side shot of the Vintage Subway Car.


An elevated shot shows the rivets go all the way over the roof.


 This overhead shot shows the full train from above.


The same shot of the NYC Subway Train for a birds-eye viewpoint.


Another shot of the end model where most of the details are present.


 Rendered out this is useful for Graffiti backdrops as well.


 An exploded view shows the various parts I made and groups
[ Doors, Roof , End, Walls, etc]


3D Stock Model Build Review
Vintage Subway Traincar built for online sales 2005.

Client: The Cimarron Group for Stock 3D Model Sales.
Art Director: Myself.
Project Date: November 2005.

Back in 2005 I was still in-house as the 3D Design Director at The Cimarron Group, and I regularly did both 3D Illustration, as well as 3D Animation for the print and AV division, in which I built out highly detailed 3D Models, and today I am reviewing a 3D model I made specifically for online sales, something I would do during down-time.

I build my 3D models with a high level of detail on the parts so that the end user of the stock model can use them for close up shots and this Vintage Subway Car was no different.

I have built out a few trains and did a vintage train back in 1999 for my Launch.com work and can be seen here. I love to build objects that can be used for Steampunk as well.

The model is still for sale online at the largest 3D stock company TurboSquid and can be bought here.

I will continue showcasing many of the stock 3D models I have from various companys I have prepared them for in future posts, so enjoy!


Cheers, THOM

Monday, May 6, 2013

3D Model Sales Part XXI Vintage Hanging Socket and Edison Lightbulb 3D Model

 
 The final Model rendered out that I sell online now at Turbosquid as 3D Stock.
 The base Light Socket rendered out on a polished surface.


 The 3D Model is sold online with a pull chain and a thumbscrew switch

 
  A Smoothed render showing off the 3D Model in a multi-view
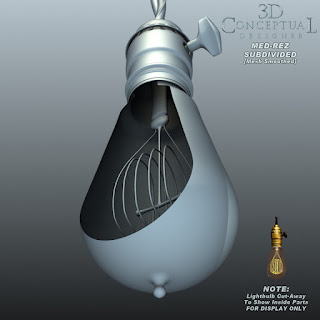
  A base Polygon render showing inside the bulb.

  A smooth render of the same

  A close up of the threading details on the socket base lower lip.

  A smoothed render showing the area

  A base non-subdivided render showing lamp from below

  A smoothed render at this Worms Eye view.

  A close up render showing the cord connection up top

  A smoothed render of the socket top

  A full view render with cord without subdivision added

  A full render mesh-smoothed at two levels.

  An exploded parts view of all that was built in 3D

  A close up render showing the two ON/OFF meachanics

  A close up render showing the parts for the cord connection


 A close up render showing the parts inside the bulb.


3D Model Sales
Part XXI
Vintage Hanging Socket and Edison Lightbulb 3D Model

Any photo-real 3D render starts with a very accurate and detailed model built out in 3D, so I sell my 3D models I build online as stock 3D models, similar to stock Photography to be used by design and graphics professionals within the various industries online at Turbosquid, the leading stock 3D model house, and today in my PART XXI[21st], I am reviewing a Vintage Electrical item I have built in the past, but did a very high resolution version for sale online as a new 3D Model for sale.

This is a full 100% subdivision model that you can increase the level of detail with the subdivision modifier applied in your program of choice and this model also was built with real threads on the bolts , screws, and even the main housing itself with the mini threads down near the lamp base to add on various attachments that at the Turn of the century were common, as this fitting was seen in every home and business thru out the country. A very high resolution asset.


This would make a great addition to any vintage 3D scene or 3D animation as well as perfect for a steampunk project or illustration.

I export all my 3D assets to FBX and OBJ so my friends in Cinema 4D , Maya, and Soft-XSI can use these assets as well.

To view all my 3D models I sell, you can go here. If you want to see a couple of hundred of 3D models I built in the past that my prior employer still sells, you can go here too.

Cheers, THOM

Monday, April 8, 2013

Project Review: Menagerie Creative-Steampunk Styled Website 3D Design Illustrations for user interfaces 2009

     The final Rolodex design concept I designed out and rendered in 3D back in late 2009.


This ambient render shows the geometry in the build.
 

A 3/4 angle shot on the depth in the scene.


The polygon shot shows the cabin from the flying luft-craft I did here was reused.


The mail screen as a final render.


       The polygon shot of the main web-mail interface I helped design and build in 3DSmax.


 This 3/4 shots shows a few parts were 'faked' to match some of the 2D Art Direction I received.  Sometimes it is faster to quickly match the 2D and back-fit it later


 The 3/4 view in polygons for the mailbox scene I did in the steampunk look for Menagerie.


Project Review
Menagerie Creative 
Steampunk Styled Website 3D Design Illustrations for user interfaces 2009


Client: Menagerie Creative.
Creative Director: Cheryl Savala.
Project Date: November 2009.

I was asked to help out and design a steam-punk styled website to match the logo flying craft I helped out with here, so I created tow main screens for the website design and we can review those now.

The first design of two, was a Rolodex like address roll design for the site that would be animated by Dean Fowler once the design was locked. I created a few versions for Cheryl and rendered out a still for approvals. Once this was done I sent it off and Dean animated it and got sign-off with Cheryl for the move itself. I then took it back and rendered out the moves using my lighting and rendered.

I next did a communications interface with a mailbox that would animate up turn, and open on up. I did a few rounds in 3D Design on that one as well. Once the still image design was locked and tweaked out on their end, we got the animation over to Dean to lock in all motion as well, then I rendered the finals again in Cebas' Final-Render product for the finish.

A fun project to design and implement, and I always love working with a great motion designer like Dean.


Cheers, THOM