Showing posts sorted by relevance for query Night at the Museum. Sort by date Show all posts

Friday, April 12, 2013

Project Review: Night at the Museum PART III: T-Rex Head and Neck sculpt

The Final shot of the T-Rex Head and Spine I made for the first Night at The Museum advertising work back in 2006.


 I did a few alternates at a high and low angle as some comps needed a different angle and this is where 3D illustration becomes the best cost solution to the graphics needed.


I low angled shot of the head edge lit.

The base Poly as I built it ready for the subdivision to be added.
 

Here I have applied a subdivision to the Polygon Mesh at a low level of one.
[ quadruples the face count=4x]


The levels of subdivision were increased and for most shots this level worked fine.
 

A look at the Head and Neck Spine as built for a few 3/4 angles to show the full build needed.


Project Review
Night at the Museum

PART III: T-Rex Head and Neck sculpt
Client: Twentieth Century FOX via The Cimarron Group.
Art Director: Myself.
Project Date: Summer 2008.

For this  my third posting on the 3D Illustration and Motion Graphics Animation work I did for the advertising campaign for the two films, Night at the Museum, and today I am focusing on the T-Rex Head I sculpted out in 3D to have for 3D illustrations for the two films.

I have posted a shot in the past here, so today I cover a behind the Art build of that 3D Illustration in more detail.

I hand built the skull first as we had a little T-rex model we got online that was a bit cartoony in the face, so I rebuilt the head and neck as seen here for the majority of he comps as they all used the head poking into the shot at some point, so I built it out subdivision to use for close and long shots. I then added the neck too as that was also too rounded and not matching up to the film scrap I had at the time.


I also used the Simbiont Dark Tree procedurals to get the bone texture just right, as well as the Final Render Dirt Shader to get the aging into the nooks and cranny's in the head. The final finish was a black tar finish similar to the Museum bones found in the film.

You can review PART I here showcasing both films I did work on for the Advertising, or PART II with the Tablet here.


Cheers, THOM

Thursday, October 24, 2013

Project Review: One Sheet Key Art 3D Illustration for Night at the Museum 1 -PART IV

Here is the final Background 3D Render used in the finish for Night at the Museum 1.


 The 3D Scene is straight forward, a virtual replication of a hallway used in the sets from the film.


I provide a Z-Depth channel allowing the Art DFIrector to do effects based on distacne from camera as this gives 256 levels of depth for them to blur, desaturated etc.


 The Middle ground final render of the Dino Tail build all Quad Subdivision.


Here is the base Polygon Mesh model with subdivision removed.


Here we see the final subdivided mesh[ 2 levels]


 The final render for the foreground archway model. This came in at the last day a change the client made in finishing.


  The Archway was a basic block model with modeling grout and blocks.


The final 3D Logo I built for the MGFX and the Print work.

 A Screenshot shows the rough layout provided, a screen shot so I could match the angle, and the final poster on the RIGHT.


Project Review
One Sheet Key Art 3D Illustration for
Night at the Museum 1
PART IV

Client: Twentieth Century FOX via The Cimarron Group.
Art Director(s): Calvin Sumler, Chris A. Hawkins, Joseph Stamper.
Project Date(s): Summer 2006, 2008.

This is my fourth posting covering the 3D Design, 3D Illustration, and 3D Animation work I performed for the Theatrical Advertising campaign for Night at The Museum[ Parts I and II], and today I am covering the three final renders I did for the One-sheet finish on the first film.

I was asked to take a shot from the film of a hallway, and build out a virtual version that was longer and wider, as they wanted to put a large portion of the cast on the poster so they needed a lot more room, so off I went to create the shot.

As the project progressed they added three more renders, for the first one I built out a Dino Skeleton Tail to put into the Middle Ground of the scene, for the second one, they then decided to create an archway as a foreground device, to stage the poster a bit better so I created this render as well as the third and final render for the poster.And finally I did a 3D Logo.

These were big renders at 4500 x 6650 and took a long time to render, so at the time I had a 10 blade render-farm available so I did a distributed single frame render and threw 12 PC's total on it to get it done over nite.

You can view PART I here, covering the two film posters I worked on.
You can view PART II here, the Golden Tablet Motion Graphics 3D Animation I did for the trailers.
You can view PART III here, covering the Dino Head build.

Cheers, THOM

Friday, July 9, 2010

Project Review: Night at the Museum 1 and 2: PART I

The Finished One Sheet for the First Film using a full CGI interior, Logo, and Dino tail.

The CGI back-plate for the Museum Interior I made for the One Sheet.

A Hero shot exterior of the Museum for an AV piece I made[ in my reel]


A teaser Idea of the Logo above the entry window arches[ Second Read].

The Dino Head I made for various Comps and the Web animation.

The Main 3D Tablet is from the Second Film Campaign.

Ben Stillers Characters flashlight on the stairs of the Museum for the Second Film Teaser.

An early Client Idea of the Lincoln Memorial from the Second Film. [I made it for X-Men 3]


Project Review
Night at the Museum 1 and 2
PART I

Client: Twentieth Century FOX via The Cimarron Group.
Art Director(s): Calvin Sumler, Chris A. Hawkins, Joseph Stamper.
Project Date(s): Summer 2006, 2008.

While running the 3D Design Dept. at Cimarron, I worked on the Print and AV advertising for The Night at the Museum. For the first film I did a lot of different tasks, including the main museum from the final poster being all CGI, to the dinosaur for the online games and tie ins. I also animated the cards for the AV spots for the movie as well.

For the second film the work was about 1/4th that of the first film. I did an animated Egyptian Tablet that is used in the film for the AV team, and I did a series of comps for the print team as well re-using the prop already made for AV. I also did a few "flashlight" ideas for both the second film and a DVD double feature.

Cheers, THOM

Wednesday, September 5, 2012

Night at the Museum 2 PART II: The Golden Tablet

 Here is the HD frame from the Motion Graphics piece I designed and built for the advertising pitches for Night at The Museum 2: Escape from the Smithsonian.


 An angled camera shot of that same 3D Scene from above.


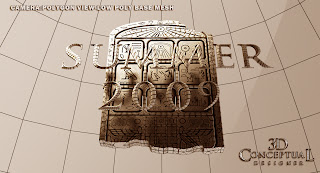
  Here is an ambient render showing the base polygon meshes.


 Here are the wires for the subdivided Turbo smoothed object. 
[over a few million faces]


 A close up view shows the smoothed mesh details.
[ NOTE the one panel that is double rez had some issues, so for time concerns I smoothed twice]


The base poly mesh with the single point beveled type.


Night at the Museum 2
PART II: The Golden Tablet

Client: Twentieth Century FOX via The Cimarron Group.
Art Director: Myself.
Project Date: Summer 2008.

For my second posting on the 3D Illustration and Motion Graphics Animation work I did for the advertising campaign for the sequel to Night at the Museum, I am focusing on the Mystical Tablet from the film that I built out as a virtual replica for the trailers.

I hand built all splines for the design of the tablet from a few screen grabs we had from the film. I then proceeded to build this all out as a quad model Pro-Boolean, which is available in 3DSmax with the n-Power tool.

This technique allows me to add a Subdivision modifier to add geometry and to soften the sharp edges out to feel more like a molded or cast part. The final Motion Graphic application I did, can be seen in my reel with the central tic-tac-toe panels all able to rotate for effect.

I used the Simbiont Dark Tree procedural bump map to get the Pumice feel to the pits and layers of gold.

You can review PART I here showcasing both films I did work on for the Advertising.


Cheers, THOM

Monday, April 17, 2017

Project Review: The Cimarron Group-3D-Department Promotional Screens 2008


I did the animated splash screen for the Portrait-Promotional in-house HD monitors, that was re-purposed to the AV department for all our outgoing AV work.

 From selling generic 3D Models online, to iconic architecture for film, I also did 3D Architectural Visualizations, here Countrywide was highlighted.

 As a Graduate from Art Centers Transportation Design program, building 3D cars is a large part of what I did at The Cimarron Group.

 As an avid VW fan, building a 3D Herbie was a dream job. This asset was used in print and AV for the film Advertising campaign.

 3D-Logos are my 'bread-n-butter', so I created a screen to showcase some then current Images.

 I did a lot of 3D-Illustration work for the Film, Night at the Museum, this was a Project Specific Image I made for In-House Promotion.

 For our in-house Home-Entertainment Division, I did 3D-Illustration work for packaging various Star Wars Properties.

 A Project Specific Poster highlighting some of the 3D Design work I did for Superman Returns[ 2007].

Here is a Project Specific Promotional Image for the X-Men 3 Work I did.


Project Review
The Cimarron Group
3D-Department Promotional Screens 2008

Client: The Cimarron Group.
Art Direction: Thom Schillinger.
Project Date:Summer 2008.


In November 2003,I set up the 3D Design Department, in-house at The Cimarron Group, and provided 3D -Design, 3D-Illustration, and 3D-Animation services to the existing other 11 departments in-house at the Agency, and each department was asked to create some promotional images for the various HD monitors located throughout the company.

Each department was tasked with providing a set of images to display on the HD monitors that were rotated to portrait format, to emulate one of our main products,One-Sheets. My 3D Department was asked to provide specific work that the Owner wanted to showcase.

These Images provided our guests with a quick 'sketch' of what we offered via the 3D Design Department at The Cimarron Group.

Cheers, THOM

Thursday, October 29, 2009

How to use a Z-Depth Channel from a 3D Image


Daily Planet 3D Render Color Pass

Daily Planet 3D Render Z-Depth [ Distance based] Pass Original

Daily Planet 3D Render Z-Depth [ Distance based] Pass Leveled A

 Night at the Museum Color Pass Key Art for One Sheet

  Night at the Museum Color Pass Key Art for One Sheet

 Z-Depth Render Pass
Distance based masking


In the world of 3D, X,Y and Z represent the three dimensions. Z_Depth is the third dimension that is represented as a distance going into a 3D image or 3D Animation from your camera viewpoint. X and Y represent what every 2D Designer uses on a daily basis in any Vector or Bitmap program of Height and Width, and with 3D, Depth is added via a Z_Depth going into the Depth of an image.
One great advantage to a 3D Illustration is that the Z_Depth is a pixel for pixel representation of where the object falls in the scene based on 256 levels of a gray scale. So staging your image based on distance, like adding fog only in the background can be achieved in 1/10th the time.
Another advantage to the Z_Depth image, is that you can adjust the levels in Photoshop and virtually move the distance plane through a scene and get even more custom depth selections. The finished still for One Sheet comps was built for Superman Returns in 2005.
Just one more advantage to a SMART 3D image.


Cheers, THOM

Wednesday, September 25, 2013

Project Review: 300-[aka: Three- Hundred] Website 3D Shield renders 2006

 A tilted down front and center shot of the final shield prop I made for the 300 website launch.


 A true centered camera shot for the graphic version on the shield.


 A left side extreme angled view showing off the dimensionality of the shield. This was used as an interstitial screen sweep element.


 A High right side shot, and the final delivered image.


 Here is the final subdivided and displaced geometry for the shield. I was still learning the Quad Mesh function for Pro-Boolean so this ended up as triangles with a quick turn around.


 The base mesh with displace on.


A screen capture in 3DS max 2013 of the various elements used in creating the dirt shader using Darksim procedurals and various bitmaps.

Project Review
300-[aka: Three- Hundred]
Website 3D Shield renders 2006

Client: via The Cimarron Group.
Art Direction: Eric Person.
Project Date Fall 2006.

Many jobs I do 3D Illustration for are a full edge to 3D Illustrations like what I finished out for the first Night at the Museum. A full 3D background as the set hallway was both too narrow and to shallow so a virtual set allowed us to modify it to meet the clients needs.

This shield prop represents the other side of that spectrum where all is needed is a simple or small prop rendered out, and in the case of Frank Millers Three-Hundred[ 300], they wanted a 3D shield made for various areas online.

I built this so it could be displaced as the film prop was a rough item , hand made so I did what I had time for in the fast turn around to get close to what was needed. 

Also this was to be small, around 400 pixels wide, so I rendered it at 2X size [ 800 pixels wide] as the renders were fast at about 5 minutes even with the Darksim procedurals and Final Render dirt shaders which take more time to go, but deliver much better results. 

I usually will go 2X[cubed in surface area] in final render size if the client can afford it, as the file is bigger in case their client wants to see it larger, so they don't need to come back for more renders from me.

This was a 2 hour job, fast and typical for something like this. I delivered four renders at a modest 800 pixels width with an alpha channel [ 32 bit TGA file]so they could Flash-Animate them[ in 2D] and drop them into the various online pages needed.

A fun 1/4 day job and budget friendly.

Cheers, THOM