Showing posts sorted by relevance for query firearms. Sort by date Show all posts

Thursday, June 12, 2025

The Kingsman: The Secret Service 2013- Firearm Logos and King's Crowns PART II


My first crown design alternated the firearms to create visual gaps to match an actual crown that would typically have points.


This Clay Shader Screen Grab showing the wire-frames of this file I built from a higher angle.


This Second crown design spaced out the firearms to create visual gaps and had a band-ring made up of a variety of ammunition that I had from prior projects as well. I also sell the models for those online for $35.oo at TurboSquid Stock Models.


This is a Clay shader Screen grab showing the wire-frames for this second design I built out in 3DSmax at a slightly elevated angle.


This second Screen Grab of that design is a close up on the model details as you can see that the hand-grip was modeled, and not mapped. The 3D Bullets are all Sub-D built.


This Third crown design spaced out the firearms in a circular array with the objects rotated to interlock and space them out.


This Third Design Screen Grab is closer on the model at an elevated angles showing the full 360 nature of the model. I frequently build the files like this as I am asked to proved them to Motion Graphics artists for MGFX Trailer work.


This Fourth crown design snugs the object much closer with less gap between them.


Moving forward I am reviewing the 3D logos built into a firearm for a Secret Service Agent. This is a sheet of preliminary designs I rendered out at a smaller resolution to get feedback without breaking the budget prior to more direction.


Another Clay shader Screen grab showing the wire-frames from the preliminary design work at a 3/4 lower angle.


 Clay shader Screen grab closer to the Camera View showing the wire-frames. I love the multiple stacked Kingsmen on the grip texture it emulates.


Clay shader Screen grab with the wrapped text on the silencer at a low angle showing the depth the text is going into the main model to get those deep shadows as the file is extruded more.


Clay shader Screen grab closer to the Camera View wrapped on the frame and silencer here.


A much simpler design with different versions of fonts to render on the same file.


A bit bolder and brighter with the font on this one for better legibility in this larger render


A low 3/4 angled view of the above design showing off the dimensions a bit more.


Large Text over the frame of the firearm covers it almost entirely.


The final design I curved the text on the silencer to conform to the cylinder shape. You just cant beat a curved surface to get the best value contract in the lighting.
 

Project Review
The Kingsman: The Secret Service 2013- Firearm Logos and King's Crowns
PART II


Client:  20th Century Studios via BOND
Project Date:  June 2013.
Direction: Patrick Dillon.


      This is my second post for the work I did for Patrick Dillon at BOND, and today I am going to review my firearm based logo's and King's crowns I was directed to create for the franchise, The Kingsman: The Secret Service. 
 
       I was provided ample direction and vector files for the typeface work so I could begin the project. As a concept artist I can start from nothing or from just a little, to full direction, it's up to the client.

      I have been building firearms going back to the Glass Walther PPK I did for the James Bond franchise going back to my time at BLT Communications when I began in Key Art in 2001. I have more than a few 3D Models of Firearms and weapons that I have built, and for this project I used many assets including the Dessert Eagle and a Beretta I made. These were built with BREP objects that are NURBS from nPower Software based builds, so not a Sub-D build in Quads.

     This work did not make it to finish for the final Key Art, but I continue in my craft for each assignment I get the privilege of working on.To visualize in 3D is a challenge in composition and lighting and I love what I do, do it is a win for me.

     I will be posting more Key Art 3D Illustration and 3D Logos I did for this The Kingsman: The Secret Service for BOND in future blog posts here.

-Here is a link to PART I: covering 3D badges and Emblems I did.

     I am back to full time freelancing as I await the US Job market to pick back up, so big or small I would love to assist you in any 3D visualization work for your projects. My Linked in Profile button on the right column has all my contact details in there along with in my experience section.
 
                                 Cheers, THOM

Thursday, March 18, 2010

3D Firearms


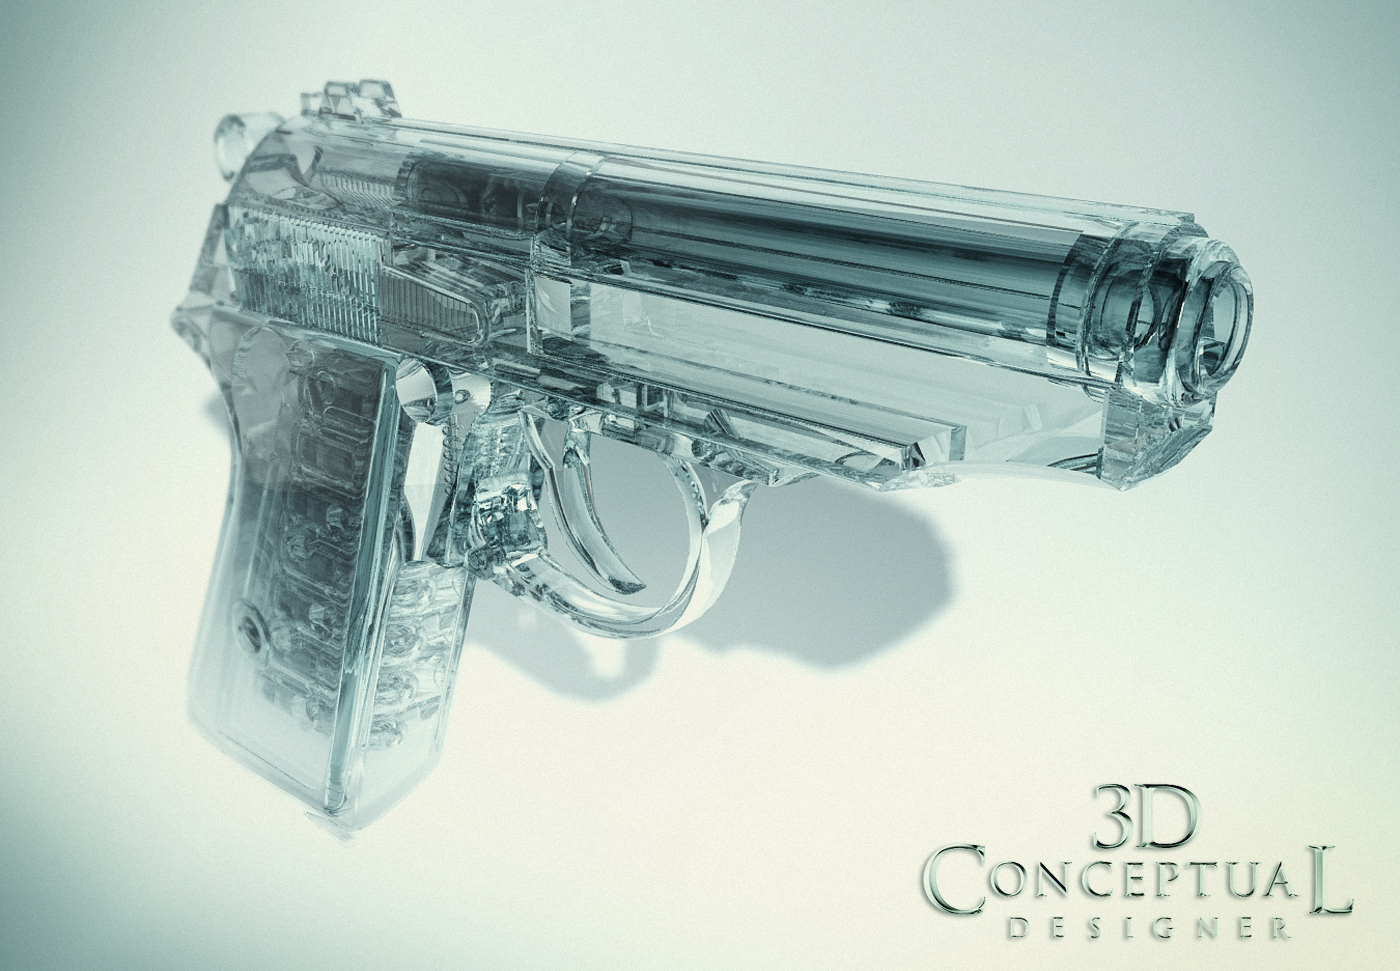
 Walther PPK [ Old Model] for the 007 Bond Franchise-[2001]


Old West over-under rifle-[2004]


Beretta .38 from Lucky Number Sleven-[2005]


Not actually a firearm, but close-The injector gun from Paycheck-[2002]


M4 Assault Rifle from SWAT AV campaign teaser-[2003]


Desert Eagle .50 Cal from Collateral-[2003]


.38 Special with a pretzel knot in the barrel-[2008]


Exploded views of the .38 Special[ Snub nose]


3D Firearms PART I

Since my first days in 3D illustration I have been building firearms. My first was a Walther PPK for James Bond in the World is not Enough where the theme was Ice, so I built a fully transparent gun with all internal workings.

Since then I have built from scratch about 6-8 firearms with about half being full models with all internals as well. A few are for sale online from my old employer The Cimarron Group.

Cheers, THOM

P.S. You can Link to the .38 Special for sale online by clicking the post title, or paste this text into your browser:
http://www.turbosquid.com/3d-models/38-special-handgun-3ds/320939

Wednesday, August 28, 2013

Project Review R.I.P.D.-3D R.I.P.D. Concept Badge 3D-Logo Icon Design for Key Art 2011. Cold Open PART II

 Here is the final Design presented for the R.I.P.D. Badge Concept for the Teaser Posters I built out in 3D.
 
 I did a warmer metal version with less dirt and aging for this one. The idea was to be able to paint between the two renders to get a dual finish feel, so the edges could be worn back to the brass casting etc.
 
 A darker version with a bit of edge lighting to it for RIPD.
 
 STEP I:
To create the badge as a single molded part I first create all the parts separately.
 
 STEP II:
Here are all the parts placed and ready for the Pro-Boolean operation. NOTE: I always save this[ and all steps separately] in case I need to go back to adjust, since all Booleans are a bit squirly.
 
 STEP III:
Here all parts are combined into one with the mesh output set to QUADS.
 
 STEP IV:
A apply a bend in both X and Y directions to dish the badge.
 
 STEP V:
The second bend is applied to the modifier stack in 3DSmax.
 
 STEP VI:
The final design with the subdivision added[ here it is with one level, though the finals had 2]
 
 A view of the final R.I.P.D. badge design with the skull and cap with dual firearms added up top.

Project Review
R.I.P.D.
3D R.I.P.D. Concept Badge 3D-Logo Icon Design for Key Art 2011.
Cold Open PART II

Client: Universal Pictures via Cold Open.
Art Direction: Gardner DeFranceaux.
Project Date: December 2011.

This is my fourth post on R.I.P.D., and my second for the Agency Cold Open. They were doing Comps for RIPD, and came up with a great design for a badge so they contacted me to create the 3D sculpted version for the teaser posters.

I received the vector outline files from Gardner, and we discussed the look he wanted to have with it so I proceeded to create the parts necessary to make the badge. Most quicker 3D models I make, are all separate parts and retain a very sharp edge in the parts themselves as well as at the intersections, but when you look close-up on most badges, they are cast and molded parts, with blended parts with filets and rounds thru-out the design, and this was the route that they wated to go.

I had developed a quick technique to do this using the Pro-Boolean in 3DS max, and this technique is dependent on that Plug-In as it can output the file in a Quad" format so that the faces come subdivided and ready to go for the most part.

Once the Pro-boolean was completed I added two bend commands to dish the badge, as all badges are not quite flat but are dished and bent to conform to the human body better, so I applied this onto the mesh output then subdivided the final. I added in the skull with police hat, as well as a pair of firearms[ I had not built the special gun from the film yet, and would have replaced it with them if this did go to a finish].

A super fun concept to flesh out.

                       Cheers, THOM

Wednesday, June 25, 2014

Project Review: The Purge 2012-3D Concept Illustrations-Backwards Revolver

The final shot in a polished metal finish for this backwards facing revolver done as a conceptual 3D Illustration for marketing the film The Purge.

A BLued darker version was done as an alt as well for the 3D Illustration. I delivered these at 150DPI @ 10" wide for a typical 11 x 177' Comp presentation. If this was to finish I go 4500 pixels wide a typical size for a One sheet Poster.


The backwards frame was build subdivision, though most parts are Npower Power Nurbs conversion parts from a number of project that I have worked on.


A 3/4 birds-eye view of the top area on the gun.


 A view exploded out to show the parts I built inside the firearm illustration.

Project Review
The Purge 2012
3D Concept Illustrations-Backwards Revolver

Client: Universal Studios via Cold Open.
Art Director: Noah Witlin.
Project Date:April 2012.

A good use for 3D Illustration is to make props that do not exist in real life,and to make them look real, and for the film The Purge, I was asked by Cold Open out of Venice California, to create a revolver firearm that shoots backwards. To create this prop in real life would require a good CNC mill and a much higher budget, so I did a virtual 3D Illustration as this was just over a half day to complete.

I have built a number of 'virtual' firearms in the past, so I took a few parts I had already made and created a new frame for the revolver that aimed at the user for this concept piece. The detailed parts were made with modeled in details with the knurling and grooved sight, rather than a bump fake.

I rendered the finals out on a white cyclorama with a blued darker metal as well as a polished metal version for presentations.

A fun conceptual piece.

Cheers, THOM

Friday, February 28, 2014

3D Stock Model Build Review Fabrique National Herstal F2000 built for Splinter Cell Pitch in 2005

A 3/4 side view of the Splinter Cell firearm 3D model I made for the advertising pitches back in 2005.

The wire frames shows I did a lot of solid modeling and converted to polys.

The other side of the rifle showing a bit more for the front in this render.
 
 Wireframe renders to show the build.


 A close up on the details in the various torx and hex screw heads in the construction of the composite virtual replica.

Wire frame of this close up shows a few quad modeled asserts bust mostly Solid Modeling.


A birds-eye overhead back view [POV] of the firearm.

 
The birds-eye wire frame 3D build shot at the same angle.


 An overhead showing the details out front on the business end of this beast.


A very complicated cast body to recreate, and the frame is what took most of the build time on this one.


A close up underneath the gun on the trigger areas.

 
The wire frames show the way I built each part, some quad sub-D, some solid models converted to polys,  and some beveled parts and extrusions.


A nice exploded view shows the various pieces I made for this prop build out in 3D. We planned to use the gun in an MGFX animation, but it never went to that stage, so it went up for sale online instead.


3D Stock Model Build Review
Fabrique National Herstal F2000 built for Splinter Cell Pitch in 2005

Client: The Cimarron Group for Stock 3D Model Sales.
Art Director: Myself.
Project Date: December 2005.

Back in 2005 I was 3D Design Director at The Cimarron Group, and I regularly did both 3D Illustration, as well as 3D Animation for the print and AV division, in which I built out highly detailed 3D Models, and today I am reviewing another 3D model, and this one was the specific firearm used by the main character in Splinter Cell, a Fabrique National Herstal F2000.

I have built out many 3D firearms for both print and MGFX work from 007 on up, but this is a very unique designed firearm that has a fully composite frame and fully molded look, but since we were pitching Splinter Cell back then I decided to build this asset out as I had for the iconic Goggles as well here.

I build my models with a high level of detail on the parts so that the end user of the stock model can use them for close up shots and this Microphone was no different. This model was also build suing N-powers Power-NURBS software and exported out as geometry.

Some is a bit rough, but just after building this out nPower added the 'convert to quad mesh' feature which I use almost daily now, to fix all those open grid spaced on the stock frame seen in the wire frames above. If I was building this today I'd go full quads rather tha n a solid build much cleaner for end use and scalable.

The model is still for sale online at the largest 3D stock company TurboSquid and can be bought here.

I will continue showcasing many of the stock 3D models I have from various companys I have prepared them for in future posts, so enjoy!


Cheers, THOM