Wednesday, June 4, 2025

Project Review: 3D Title Badges for The Kingsman: The Secret Service 2013 PART I


The First Badge Concept for Key Art use for The Kingsman: The Secret Service. I used a crosshatching texture engraved into the background field to give it a finished filigree as a second read on this 3D Badge concept I built.


I always render out a Z-Depth pass which is used as a mask in Photoshop or After Effects to mask based on distance the pixels are from camera so lens effects and Depth of Field can be applied in post.


The same 3D model from the First Badge Concept with a much more simple patinas metal finish with smooth surfaces.


For this version, I added in a dirt procedural shader with Cebas Final Renders Dirt Shader Material to get rust in the tiny cracks.


For this design I added in the concentric circles into the background area to once again add in a second-read level of detail behind the type itself to increase legibility. Holding devices are typically used in 3D Logos work to help with any legibility issue that may arise.


This was a lighter version of the top design above that was not as moody and dark, but still had that cross hatch had drawn texture in the design.


The 3/4 angels render show the model depth and stacked plate design as it was built for use in Motion Graphics and animation use as needed.


A Screen Capture of the 3D file in 3DSmax with the clay shader showing just the surface. Here you can see the Center Bevel, or single point bevel for the small type on the lower ribbons in the badge that I built Sub-D as Quads.


This Screen Capture view of the 3D file shows the leaf sprig details that surround the center crest design , and these were also built using Sub-D as Quads.


Another Screen Capture of the badge showing the multiple levels on the "Secret Service" type and a second layer also in the center crest area to get nice little double and triple highlight in the file. These especially show up in Motion Graphics with lighting and object.


A Screen Capture showing the full design with all the vacuous layers and object used to give it real-world depth.


The Second Badge concept for Key Art use is rendered out here based on vector files provide to me by the Agency BOND. I built out the hammered texture in 3D and applied it to the design in the version. This render is also a top favorite for me in this design concept set.


This Concept went a bit warmer in lighting and I added a fine mesh screen detail to the holding device back of the badge here. It really added that legibility needed for the Euro style font as it is much thinner than the top concept and it really helped it pop out better.


The  crosshatched texture from the top post was added to this second design as I loved the semi rough feeling it gave the design as a hand cut look as the texture I build was hand drawn then scanned and made to tile for this work.


 This last design was smoother look but with a bit more patina added to show an older object with weathering and some light rust corrosion with runs and drips.


Project Review
3D Title Badges for The Kingsman: The Secret Service 2013
PART I


Client:  20th Century Studios via BOND
Project Date:  June 2013.
Direction: Patrick Dillon.


      I was called in by Patrick Dillon at BOND to build out a few 3D badges for a new franchise, The Kingsman: The Secret Service. After leaving The Cimarron Group in 2009 I was a contract freelance 3D Designer for his company, and this was one of my favorite jobs that I did for him. He graciously allowed me to share my work from my projects over at BOND, do go check their work out at the link above.

       I was provided a packet with Adobe Illustrator vector files as well as visual reference for a variety of concepts that I will be posting for this film. Provided direction helps move me into the work that the teams have already put into the designs and gets me up to speed quickly. I can work from a few words, but visual reference is always a way to save money and especially time on Key Art projects like this.

      Typically when I begin, I first go through the vectors to equalize them and fix any issues I might find. I also convert any bitmaps supplied into vector files too if I need to build them out in 3D, so I can build off of the vector itself, it becomes the 3D object via extrusion and subdivision.
 
     The Entertainment Advertising world is a very fast paced business. All work I have done for this industry in the past decades is always needed very quickly with turnarounds in hours and days, whereas most VFX 3D work is weeks and months, so I have learned ways to build and render quickly. I applied that to this set of projects and was very pleased with the results.

      I have been building out 3D Badges used in Key Art going back to my first poster work on Minority Report at BLT Communications. I was building out the Badge used in the film and it became a huge part of the Key Art once I was hired in full time back in 2001. So when this work came in from BOND, I jump in with high enthusiasm, and my skills had grown since that first work I did.

     The work did no make it to finish for the final Key Art, but for me the process and the designs were one if my favorites to do. As a 3D Designer, I learn something new on every job, each time I build, and I had some break through moments in lighting and procedural texturing on this job that I still apply to my craft to this day.

     I will be posting other Key Art 3D Illustration and 3D Logos I did for this project for BOND in future blog posts here.I also will post some other Kingsman work that I did for various other Agencies as well.

     I have worked remote since 2009, and this work was one of the last jobs I did for BOND prior to relocation out of Southern California back to Colorado. Thankfully the work from Patrick followed me out here, and I continued to do work with them from Colorado up to Covid in 2020.

     I am full time freelancing as I await the US Job market to pick back up, so big or small I would love to assist you in any 3D visualization work for your projects. My Linked in Profile button on the right column has all my contact details in there along with in my experience section.
 
                                 Cheers, THOM

Wednesday, May 28, 2025

Project Review: 3D Title Design for Alice's Adventures in Wonderland - Australian Ballet 2023

  
 The first finished Key Art Image in Wide format graciously provided to me by Carnival Studios.


My render of the first concept as a Center Bevel in Gold final design.


I always render a second pass with an Ambient occlusion pass using a Cebas Final Render Dirt Shader to accentuate the crevices and intersections to give movement to the form materials.


The wireframe is shown here with 2 levels of Sub-D or mesh-smooth added to smooth out the letter forms as seen especially in any curved areas


Here is the base mesh as hand built with the equalization of polygons over the title for a better render. This is a also used for mocking up MGFX animations as a lower rez model is much easier to work with and saves time and money for the client..


A 3/4 angels screen grab show the deep bevel giving rich highlights and shadows.


The second design which was picked for final Key Art use, has the Pillowed face with soft rounded faces and edges.


 The Sub-D subdivided mesh with 2 levels for detail was sufficient for the final.


The low poly base mesh shows I used a very early stage of the Center Bevel model and flattened out the face with just a slight lift in the center to add in the desired crown so the reflections and shadows would roll off with nice gradients and no sharpness.


  This low 3/4 angel screen grab shows the pillow effect with a soft continuous surface from depth extrusion to face.


 A second finished Key Art Poster graciously provided to me by Carnival Studios.


Project Review
3D Title Design for Alice's Adventures in Wonderland
Australian Ballet 2023


Client:  Australian Ballet via Carnival Studios
Project Date:  June 2023.
Direction: Demi Hopkins.


      I was called in by Creative Director, Demi Hopkins to build out a 3D Title treatment for the Australian Ballet for a show called Alice's Adventures in Wonderland. I have worked on and off in a freelance capacity for Carnival Studios for over a decade, and this time a few concepts for the Key Art for the Ballet were needed. I am thankful that Demi graciously allowed me to post on this title treatment for the Australian Ballet.

       I am typically given an Adobe Illustrator vector file as that is the quickest way to start my 3D Build. I can easily work from a bitmap and use a vectorizing program like Vector Magic to create an outline that I then clean up in my 3D program 3DS max. This will increase costs slightly though. I do rework all vectors before building out to equalize the vertex points to I can have a good clean mesh and even spread of polygons for the form to then reflect smoother curves.
 
       I have been doing 3D Titles used for Key Art for just over 20 years now, and these were all built in Autodesk's 3DS Max as Quads with Sub-D [ Mesh-smooth] applied so that they would work with Motion Graphic needs as well. These assets they can be up-rezzed as high as your processors can handle and a director can get David Fincher'esque close ups and fly in's as needed.

      I first built the design out in a popular Center Bevel Design, or Single Point Bevel, which has all bevels meet in the center of the font shapes. It is a very clean look and you get the most bang for your buck with edge lighting especially in in MGFX animation..
     To do this right, it is a hand built model. The nice part is if you save it in stages you can you earlier version of it for flat faced designs, as I did with the Pillow soft face design with the second one, which was ultimately picked and finished for this Ballet.

       For this Pillow faced design you want to have crown on the surface form on the face or front of the font so you can control the reflections better than a mathematically perfect flat surface which is what you get with a straight extrusion.
     It is much faster to build it flat, but the reflections, especially on high reflective materials like Chrome and Gold will not look great and the light will not attenuate over the surface giving the gradient lighting most clients desire. 
     This is what I learned in advanced surfacing as a Transportation Design major at Art Center, as with a car you need crown in surfaces otherwise a true flat shape will not look good in any material that is highly reflective. [ Example; and Older Jeep CJ door has little to no crown so the reflections go all over the place. With a Key Art title, legibility is your key to success.

     I have worked remote since 2009, and have done smaller jobs like this as my side gig so just on my evenings and weekends. At the time I did this a was a full-time employee as a Design Group Manager for a dozen 3D Visualization Artists at GM. It was understood upon my hire and negotiated to my superiors that I would do side work off hours as long as I did not compete with their core business of OEM Manufacturers of Automobiles, which I honored. 
     I am now back to full time freelance as I await the US Job market to pick back up, so big or small I would love to assist you.

                                 Cheers, THOM

Friday, May 16, 2025

Project Review: Warner Brothers Back-lot full 3D opening 3D Build out for new Feature Film Opening Part I

  An large image of the Iconic water tower on the back-lot in Burbank. This is a test surface render in ambient with 2 levels of subdivision added to it.


An multi image of the Iconic water tower showing the base quad mesh, subdivided, basic mapping, and rendered out for surface testing.

An large image of one of the biggest and oldest stages This is also a test surface render in ambient with 2 levels of subdivision added to it.


 A typical Browstone street facase build out image I would send over to Deva to show progress and complexity so that I could continue. 


3D Build out for new Feature Film Opening
PART I


Client:  Warner Brothers Studio via Deva Studios
Project Date:  March to October on and off in 2020.


     I was called in by John Busenberg to build out the architecture and streets for the entire Warner back-lot in Burbank California for a new full 3D update to the long used classic opening with the picture reflecting the back-lot taken by Mary Pickford back in the 20's over the Gold shield. This was a real honor for me to be able to get this work, and I am grateful for the chance I had.

    This was during the start of Covid-19 in 2020, so Deva had to fly a drone to get some details as the lot was not accessible. I heavily used Google Earth and Street-view of the back-lot and screen captured hundreds of shots for accuracy.

     I started with a blocked very low poly full back-lot build based on the WB PDF file they have as a map to be sure it was as accurate as possible. I was also given the Pre-Viz animatics so I knew how close we get it the camera moves, and what was to be highlighted in this new vision of the opening.
 
    John graciously allowed me to post a few of the featured 3D models I created for them. I have been doing 3D CGI for 30 years now, and these were all built in Autodesk's 3DS Max as Quads with Sub-D [ Mesh-smooth] applied so that they would have a longer shelf life so that they could do better close ups with Higher resolution, and still use the base low-Poly models for a faster pipeline.

     In this post I focus on a few areas, starting with the Iconic Water Tower on the lot. This also became a "Hero" focus of attention in this concept. I had such a fun time building this. I see the 3D model itself, with surface and form being the place where you must put a huge amount of effort in as this is what makes lighting and textures work the best. I was counting rivets in the fly by to get as accurate as possible. Every chain link and every panel.

     Next I have one of the Largest Stages found on the lot, and this was also such a fun build. The wood slats in the huge stage doors, to the water diverters on the exterior walls to counting steps on the stairs to make it right. Little details in the roof with 3D roofing sections will always show well with 3D lighting and Motion, something bump maps tend to fail with unwanted artifacts.

    And I wrap it up this post for the brownstone street facades, which is the oldest part of the lot and used in hundreds of films and Television shows, I am sharing the facade build for a few of the 9 buildings.

     I have worked remote since 2009, so I was well prepared as we all went this way for a few years during Covid. I hope to get approved to post additional areas in the future so stay tuned. 

                                 Cheers, THOM


Tuesday, December 15, 2020

Personal Project: Volksrod- Vintage VW Bug Hot Rod Project PART II - Work In Progress 3D Rendering Exterior

 Low angle 3/4 Side view of my Volksrod. You can see the Ribbed Semaphore signal out in this render as well.

  Low angle 3/4 Back view of my Volksrod. You can see Kafer bar as well as the Vintage Hella Brake Lights with Rock guards.

  Low angle 3/4 Passenger Side view of my Volksrod. The re'pop 20" and 22" wire wheels really give it a good stance at this angle IMO.

  Low angle Front View of my Volksrod. You can see the partial beam in the refection I added in recently here as well as the new "face" with lighting changes.

  Bird's Eye View of my Volksrod.

  Low angle 3/4 Side-Front view of my Volksrod. You can see the performance pasts under the engine and trans-axle as well as the new jack points in this shot.

  A direct Side View profile on the Volksrod concept.


Personal Project
Volksrod
Vintage VW Bug Hot Rod Project 
PART II - Work In Progress 3D Rendering Exterior


Personal Project:  Volksrod- Vintage VW Hot Rod Salt Flat Inspired Custom


      This post is my second in a series on  my personal Volksrod project [ Vintage VW Hotrod]. This post is also a Work in Progress [WIP=Work in Progress] post too, so even thought I am near done with the exterior as well as many updates on the twin supercharged motor, I have yet to fully address the interior and I am still using the Herbie stock '63  parts inside for now I built many years back for the Advertising for Herbie Fully Loaded.

     I have moved into full colored renders for a few months as I finesse and continue to model, and I have spent most of my time on this Tuxedo black and chrome version. Also, I have spent a lot of time fine tuning the body parts as well as adding in details for placeholder objects from the earlier build as I did start with the 1963 Herbie I made and wanted more accurate parts.

      In my continued 3D Modeling in 3DS Max, I have focused primarily on the seen exterior, but I have also revised a lot underneath in both the front and rear suspension areas that are not fully seen in many shots but they are made more accurate for the real build at some future point in life. 

     On the front end, I rebuilt the Pan head where the torsion bar front suspension attaches to it, so I could mock up how the Ford Deuce rails would attach in there, and added some proposed bracing and attachment points. I also rebuilt the back Trans-axle Horns on the rear pan, as the Herbie mock up was not quite accurate enough to add in the Solid Mounts for the Trans-axle I also added. 

     Also while under there I added some Vintage performance parts, including a Modified 356 Porsche dual leaf-spring Camber commentator on the Swing Axle, as well as a Engine bar or "Kafer" racing bar on the engine itself. You will also see a vintage Gene Berg Oil sump in there now as well underneath.

    Since my last post I rebuilt the engine from the 40HP stock Herbie placeholder I had in there with a high displacement [ 2332cc] adding a proper fully equal length merged with stinger[must have!]exhaust system, along with adding in Dual AMR 500 Superchargers with a custom belt system with a custom center mount fan shroud.

     I fine tuned a lot of areas on the body smoothed out the top curve, the rear quarter window, and front quarter panel and added in the Zwitter crotch-coolers. I rebuilt the jack points more accurately, and adjusted the inner fender well louvered panels out front to line up better on the pan. I also took off the headlight eye brows and added 356 Porsche styled headlight grills with matching Hella fog lights with grills below them now. I also used that fog lamp build to add in taillights out back with grills as well.

     I also cut into the B-Pillar and added in early Ribbed type Semaphore turn signal arms into the build. I had to chop those a bit as they will need to be shortened for the real life build I plan in the future too. I love Semaphores, a must have on the build and the ribbed versions are available as reproductions so they are available along with most Split sheet metal from Europe.

     If interested , I run a Vintage VW's Chop Top group on Facebook for all types of VW chop Top cars, there is a permanent link on the side bar, and you can click here as well as it has some earlier renders in raw steel I did too HERE.

     Look for more posts as I continue with this personal project on the interior next with Porsche Speedster 356 seats on deck next.
 
     If you have a 3D Design , 3D Modeling, or 3D Animation needs on a  freelance basis, I am set up and and ready to go as I have been a remote studio for over a decade. All referrals are highly appreciated!

You can view PART I here.


        Cheers, THOM

Wednesday, May 13, 2020

Project Review: NOS4A2 -AMC Series 3D License Plate Logo Design for Key Art 2019

  This is a flat image of the final file PSD Layered 3D Logo[ originally sent at 5000 pixels ]

 In order to get the final Look I did a straight metal full color render as well as the painted render. This allowed the agency Leroy and Rose to adjust and shine it up as needed.

The Ambient Occlusion/ Dirt Render pass is to add grime and depth to the 3D render.

If required I can provide a Z-Depth[ Distance based grey-scale map] for post effect to the client. You can see the 3D dents in this render , and I use it in the final render as an overlay in Photoshop to enhance the image.

Back view of the AMC Cable Series NOS4A2 License Plate Key Art Model I built.

 A 3/4 front view of the AMC Cable Series NOS4A2 License Plate Key Art Model.

I rendered this in Cebas Final Render's GI renderer[ my choice!] and this shows my custom texture Maps I built , and the various ways I use them for both the texture and displacement in 3D for the geometry itself.

The base 3D Low Poly object has the base dents modeled into it as well as using N-powers Pro-Boolean in 3DSmax to output the file as a Mesh. I clean it up  a bit ,then used the shell modifier to give the model a slight thickness like a real metal plate would have.

For quick lighting I had Sub-D down to just 2 levels making the Pre-Lighting go quicker at the early dial in stage.

 The final renders were done with this Ultra High [ 10 million plus polygon] Resolution 3D Mesh since I used an organic displacement on it

 An image of the NOS4A2 3D License Plate Logo I created in the various ways it has been used. The One Sheet won a 2020 Muse Award, and that is linked here.


Project Review
NOS4A2 AMC Series
3D License Plate Logo for Key Art 2019
PART I

Client:  AMC via Leroy and Rose
Creative Direction:  Melchior Lamy 
Project Date:  February 2019.


     I was called in by Melchior at Leroy & Rose to design and build out a 3D Design of a car license plate used on the AMC Series NOS4A2 [ a.k.a. Nosferatu ] I love working with L&R , as I do hundreds of 3D Logos each year, but 3D illustration as a 3D Logo combines two things I love.

    I recently learned that the One Sheet Poster using my 3D License Plate Logo won the Muse 2020 Design Award, and that can be seen here.

      I deliver first with a low resolution render leaving off all post effects as well as turning off Anti-Aliasing[ a.k.a. AA ] so the render is quick for approvals, since this changes a few times each round. This saves time and budget for the client so it helps manage the project. Since I have been both a Creative Director , and Art Director, I am accustomed to managing costs from above, so below!.

     Once the low resolution render is approved I do a low resolution AA render to get a time estimate a for a final. As well as adding in the other render passes. This delivery is as a Adobe Photoshop Layered file, and a Smart 3D Image, so they automatically have an Alpha channel , saving the clients time and money as the object comes masked to the pixel perfectly. I also include a Z-Depth pass which is a depth based grey-scale mask for adding post effects [ based on distance from Camera. Great for Camera blurs , adding layers of fog or atmosphere], and an Ambient/Dirt pass which is a basic grey color with a dark dirt like material that 'finds the intersections' in the geometry and darkens them up adding either aging or just a nice shadow in the cracks.

    The final design is used for Posters, outdoor, online advertising as usual, but it is also used for the various books, Hard Back Sleeve, Paperback Cover, and Audio Book Key Art. It is also found on the Packaging Design for blue ray as well used by Home Entertainment Designers.

   As a Transportation designer I love all things automotive, so even the License Plate is fun the build realistically as a stamped aluminum plate. Denting and chipping it up having to create a custom set of texture maps for the material was also a part of 3D I really get to paint with too.

     If you need a bid for a 3D Illustration , or a 3D Model feel free to contact me for a quote. I am open to Hourly gig's , Work Retainers , Part-time , and Full Time opportunities [ Open to relocation ].

     I have worked for over a decade remotely, so I am ready to go in this Covid-19 situation with Back Ups and FTP and secure lines to transfer files to clients.

                                 Cheers, THOM

Monday, May 4, 2020

Personal Project: Volksrod- Vintage VW Bug Hot Rod Project - Work In Progress 3D Modeling PART I


 Volksrod Work in Progress 
3/4 Front shot shows the custom extended headlight buckets with 60's Peanut signal light on top.

Plan View directly from above shows the overall proportion of the chop. About 7" chop so quite a "Mail Slot" look, as I want that Bonneville Flats feel the Volksrod.

  Low Side View on the Cyclorama background stage gives a nice grounding to the blocking model with a simple dark surface with a lightly blurred reflective shader from Cebas Final Renders SE product.

  This underside view shows that the majority of parts have been blocked out. I recently rebuilt the rear trailing arms to be from an early 1957 VW, so all parts were modified from the Herbie blocking used earlier.

  Low Front view is one of my favorites I rebuilt the hood to add in the 54 louvers as well as adding a Safari windshield.

 
 Low Angle 3/4 Rear shot showcasing the newly built Early form 18" front , and 20" rear 30's styled Raw Steel Wire wheels and Pie Crust tires I plan to use.

 A High Birds Eye view a bit over the front louvered hood and Early Ford I-Beam front end.[taken from this model here]
Note: I will use a second set of doors to get the quarter windows to roll down using all stock mechanics, though they will be a 1-piece widow conversion and not have chopped vent wings like in the doors.


 A Birds Eye elevated Side view. Remember this is still a WIP[Work In Progress] so there is massaging of the virtual metal work to remove flat spots[ tops of door frames] and fix up the panel gaps[ Hood to front cowl] etc.

 A 3/4 view of the Side and Back showing the newly grafted in Split Window section and louvered Deck-lid. 
NOTE: the stock single 40HP engine in there is a placeholder for now , as I figure out the mill specs: Dual 48 IDA's , or maybe a DLI Supercharger, etc.


Personal Project
Volksrod
Vintage VW Bug Hot Rod Project 
PART I - Work In Progress 3D Modeling


     I have a few automotive personal projects I have tinkered with over the years along with many Business Automotive work. Being a Gear Head, and graduate from Art Center in the Transportation Design program I thoroughly love all things automotive, especially old cars and Hot Rods. Those who know me , know my passion for Vintage VW's as well. Having owned many cars with over a dozen being vintage VW's the subject matter is one that is very easy to get onboard with.

Link to Super Sized Image above is here on CG Society.


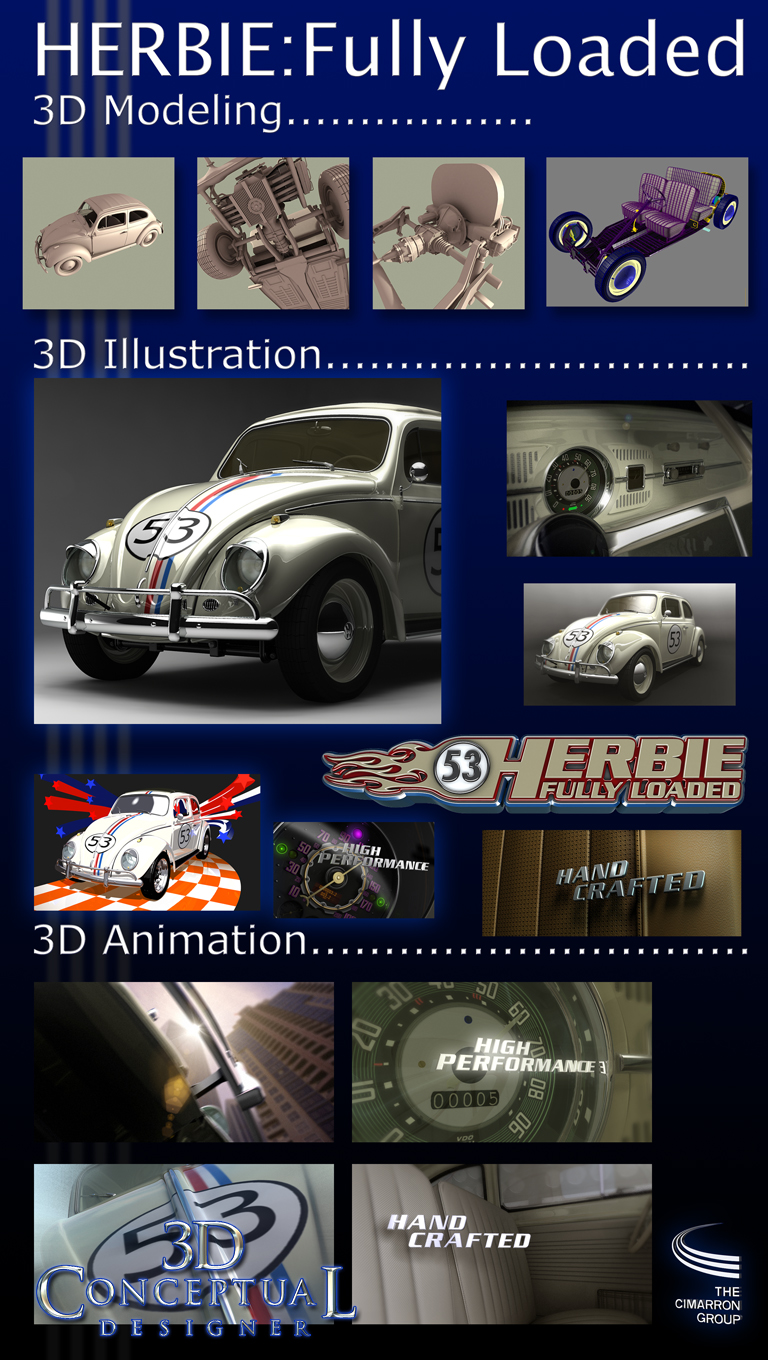
     Recently with the Covid-19 shutting down so much business, I have had too much free time , so when not looking for work, I am tinkering on my ongoing Volksrod project. A bit of history; I built a 3D VW bug [ 1963 Type 1]for the Herbie film 'Herbie Fully Loaded" while I was working as 3D Design Director at The Cimarron Group in Hollywood back in 2004. This was the first full model with interior and exterior as well as undercarriage and suspension I built. Since this model was rendered with cartoon shaders and used for both Print Posters , and 3D Animations in the TV Commercial spots it needed to have more than just the exterior skin built. 

 My 3D Herbie Fully Loaded work from a while back.

     I have since used this 3D VW model for two custom automotive projects, the first being my Bugster, which is a combination of a Porsche Speedster [ which I have also built in 3D here ] , and a Chop Top similar to the coach-built  Volkswagen Type 14A (commonly known as the Hebmüller Cabriolet of the late 40's. You can view PART I here , and PART II here.  The second is what I have posted today, the Volksrod.


 Bugster Custom VW
Hebmüller'esque with 356 Porsche parts.

     For those unfamiliar, Volksrods are a branch of the custom VW world that take their queues from the traditional Hot Rod world of the 1950's and onward. Similar to a Deuce Coupe, the cars are stripped of fenders customized with a Chop Top, or a Channeled Frame, and a sectioned body or a combo thereof. As with Hot Rods , you can find some are are High End customs , all the way to Garage "Rat Rods" some unfinished for life.

    This post is a WIP [ Work in Progress], so the work has many hours left on it. A few years back , I uploaded a short introduction video showing progress,and since then I have doubled my time into this personal project. 

     The purpose is to virtually build out the car prior to building one in real life , so I can work out the details before cutting begins. Think of this like a 3D Blueprint for the builder.

     If interested , I run a Vintage VW's Chop Top group on Facebook for all types of VW chop Top cars, there is a permanent link on the side bar, and you can click here as well.

Look for more posts as I continue with this personal project.
 
     If you have a 3D Design , Modeling, or Animation need Freelance, Part Time or Full-Time I am set up and and ready to go as I have been a remote studio for over a decade. All referrals are highly appreciated!


        Cheers, THOM

Monday, February 3, 2020

3D Prop Illustration: Props built for 3D Illustrations, Book Covers,and Theatrical Key Art and Advertisement.

 Sample Sheet of 3D illustrations of Props

NOTE: Blogger reduces Image size:
 Larger Size is here. 


3D Prop Illustration
Props built for 3D Illustrations, Book Covers,and Theatrical Key Art and Advertisement.

         Props and objects, or Products are the third area of design in 3D that I do a lot of work for. 3D Logos, and 3D Architectural spaces both interior and exterior are the other two areas I have covered before on my blog. Architectural spaces are filled with props and furniture , and beginning my career in Set Design, I worked next to Set Dressers and Prop Masters and really learned to see the vital importance of this craft in adding to an overall scene. Today's post covers a smaller sample of the range of props I have been called to build out over the years for a variety of clients.

       As a 3D Designer I am fully trained first in 2D design, and then trained in 3D after that. Good 2D principals of Design Proportions , Value Contrast , Staging , Lighting , and Eye Travel all will affect a design in 3D space . However, once the third dimension is added everything changes and gets exponentially more complicated. Tangents for example,  that do not appear in 2D will become a challenge in 3D since we can move around a design now and these will naturally come up, so spacial solutions are required to properly design something in 3D from the start.

       My prop design work began prior to utilizing 3D CGI for my clients back as a  traditional sketch artist from the start of my career. I had to design props for the commercials I worked on, as well as in Television Animation. I designed hundreds of props for The Phantom 2040 on ABC, all themed out for future time periods , as well as retro time periods for the series as Art Director. I also did a few seasons as Chief Prop Designer on HBO's Happily Ever After Series, so I have been designing out "smalls" for a while, and naturally do the same in 3D. 

      I have built 3D Props from just a photo or sketch  , or remake a 3D version of an  existing props like I did for Dreamcatcher. I especially love building custom one off props from films, as well as designing out props from scratch with no existing design. This is where Industrial Design training kicks in. Also a a longtime Thematic Designer, I am trained to extract the solution based on prop use,  features, and how close we will get to the 3D Prop, and it must fit the theme of the design it lives in.

I have well over 150 images in the sample above, you will see a good range of what I have been called to illustrate in 3D.

If  you have a need for a 3D Product or Prop, as a 3D Illustration or a 3D Model or a 3D Logo or 3D Architectural Rendering, contact me for a quote today. I am open to small gig's as well as retainers of Full-Time work. Prices are very reasonable!

I do sell pre-built 3D Models online here.
I built 3D Models while 3D Design Director at The Cimarron Group , and they are still for sale here.


                                        Cheers, THOM