Here is the final wide shot I did over a decade ago for the Hing of Queens DVD/Blue-Ray Menus.
I also always add a Z-Depth channel if the client asks for it so they can do post effects a lot easier in Photoshop.
Here is the basic wireframe ambient render showing this is a simple build out using primitives and lofts[ Pre-Sub-D quads for me]
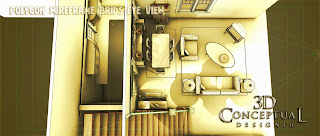
This Birds-eye shot from up at the ceiling area shows the layout.
This side shot shows the Arts and Crafts cabinet there in the dining area as well as a bit more of the blocked in kitchen thru those shutters.
A Right Side[ stage Left] of this three wall virtual set.
A reverse angle showing the fourth wall is not there.
A shot looking down from the staircase to nowhere.
Close in the dining area.
A shot inside the fake blocked in kitchen seen in blue thru the shutters in the main shot. A bit of 50's and 60's shaped going on in there.
Project Review
King of Queens DVD Artwork 2002
PART II
King of Queens DVD Artwork 2002
PART II
Client: Columbia Tri-Star Television via BLT and Associates.
Art Director: Carlos/Matt.
Project Date: Fall 2002.
Today I am posting PART II after a long break between posts for this pproject, and today I am covering the DVD/Blue-Ray Menus I designed out for the pitch packages as well.
I was asked to recreate a wide shot fo the main room for the show and was givne a some reference for the room and off I wnt to build it out.
I worked in actual Set Design for a few years so I understood what needed the big details andf what could be faked, like the kitchen in the back room seen thru the shutter blinds, so off I wnt to build this out.
Delivery was a single render, though for today's posting I have multiple angles of the geometry showing this three way typical set.
I also developed the 3D Logos and house artwork used for the First Season DVD release of King of Queens while running the 3D Design Department at BLT, and that PART I can be viewed here.
I will have other posts in the future on this project, covering the other builds in more detail as well.
Cheers, THOM


No comments:
Post a Comment