Monday, April 29, 2013

Project Review: Online Emoticons 3D Design and 3D Animation:PART I Chattering Teeth 2007

 The final 3D Design for the main Chattering Teeth Emoticon I did back in 07'


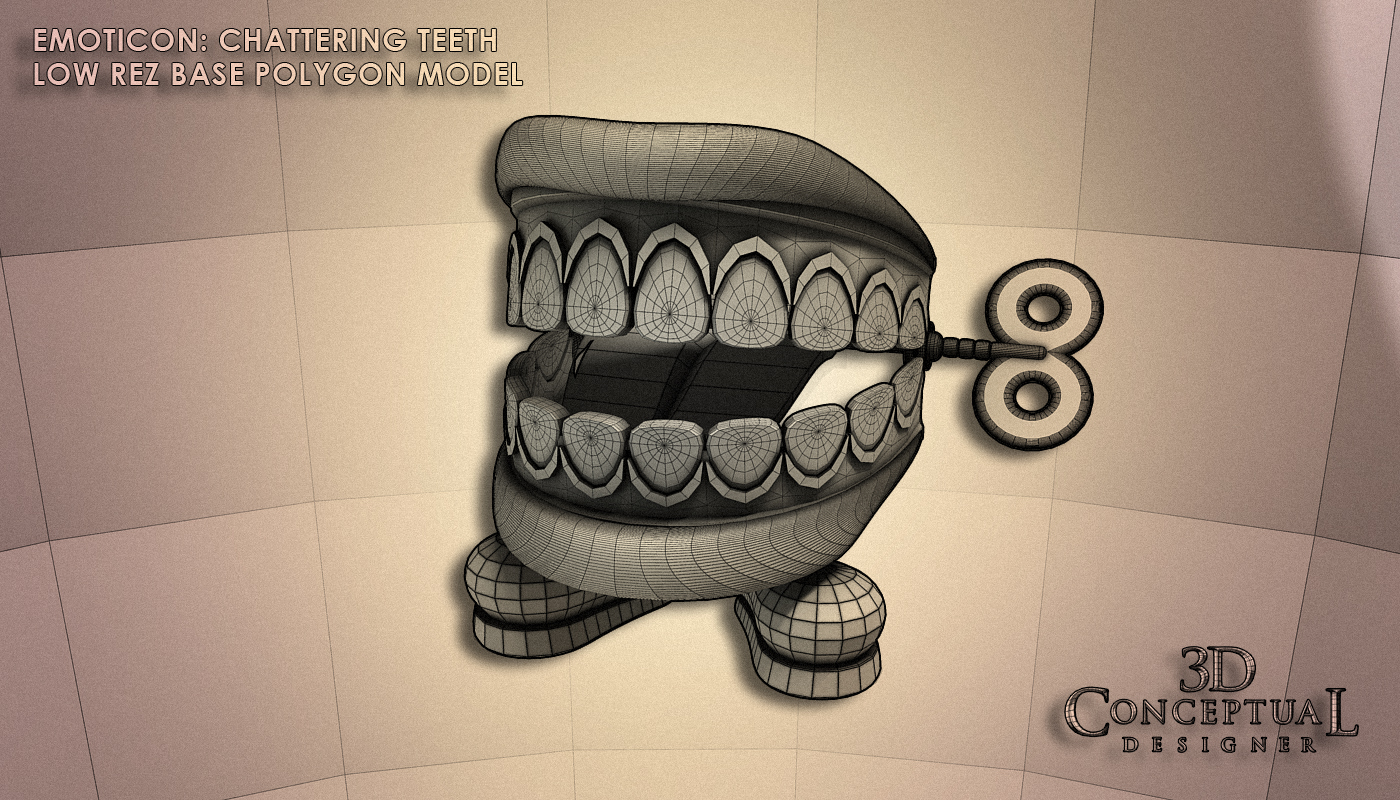
 The base model I made for this design I did all in 3D[ though I do sketch some]


 The subdivided 3D asset with smoothing added the the half of parts that are build as Quads.


 The Sombrero version was rendered at a higher angle to show off the hat more[ as directed].


 The base model with the hat addition included in this alternate concept.


 A fully smoothed out version of the model.


 Here is a Exploded view showcasing all the various parts I made in the creation of this little 3D Animated Character I designed in 2007 while at The Cimarron Group.

Project Review
Online Emoticons 3D Design and 3D Animation
PART I Chattering Teeth 2007

Client: Cimarron Interactive Division.
Art Direction: Scott Addison Clay.
Project Date: May 2007.

Back in 2007, I was still running my 3D Department of 1+ at The Cimarron Group providing 3D Design, 3D Modeling, and 3D Animation services to a full mix of advertising clients in Print, Web, and AV, and for today's posting, I am covering a project where I was tasked with creating some 3D Emoticons for an online project.

An "Emoticon" is an emotional animated Icon we see in e-mails with a little face, but taken to a much higher level to an actual 3D Character design. I was tasked with designed out four to five of these little gems that in final form were only 100 x 150 pixels in size[ a button], and would animate across the screen when you interacted with them.

Fist up in this series, is my PART I, covering the chattering teeth.

I did two versions, as they wanted one plain without a hat, and one with a hat, specifically a Sombrero. I created the base design in just under an hour and began to rig it for the animations and adjustments that would come. I built about half of the file as a subdivision model so I could increase the complexity if they did want it rendered or seen much bigger, but the micro final size of 150 pixels is so small it was not necessary to build it all that way, because as with all 3D jobs, the budget was micro so I had to create this much faster at the lower cost for them, so I went with a fast and dirty approach to the file.

As a 3D Designer trained in Industrial Design The "widget" or product in this case a cartoony styled set of chattering teeth is only the first part of my responsibility, as I must design it to fit the budget and parameters of the project and actually work for a paying client. That is something that goes well beyond a mere deadline on a piece of design or artwork, but the creation of a workable production line to create the 'wdiget' on time, on budget, and approved by the one paying for it.

Look for PART II in the future with a few more of these 3D Animated Emoticons.

                                Cheers, THOM

Thursday, April 25, 2013

Project Review: Elvis:Thru the Years-DVD Documentary 2007: 3D Illustration Key Art.

The final 3D Title Design I built out for the DVD "Elvis:Thru the Years" back in 2007.


A Close Up shot on the main Elvis script made with vintage bulbs.


A Polygon view of the final scene.


A close up on the pick-ups as well as some fully molded parts that I made with the NPower tools.
 

I modeled the strings winding around up top.


The main 3D Logo bulbs all have a big filament inside each one.


Here you can see the crown on the body as well as the neck and various parts I modeled for this 3Dlogo.

Project Review
Elvis:Thru the Years-DVD Documentary 2007
3D Illustration Key Art.

Client: Legend Films via The Cimarron Group.
Art Direction: Darren Keller and George Anderson.
Project Date: April 2007.

Six years back in 2007 I was still an in-house division at The Cimarron Group providing 3D Design, 3D Illustration,and 3D Animation services for the internal departments there, and George Anderson in the Home Entertainment group called upon me and my skills for an Elvis Documentary that they wanted to pitch a big 3D Logo with vintage bulb lights and a great 3D Electric Guitar as part of the final look, so off I went.

I had one day to do the project, and so I decided to do a few big parts using the Npower NURBS tool set so I could quickly get this up to Home Entertainment for their deadline. I'd prefer to go full subdivision, but in 07' I was not as fast as I am now so I opted for the great tool in the NURBS modeler.

The main body of the guitar is a hollow body style and has a continuous crown[curved in all directions] to the surface so it is not in any way flat, so the NURBS aproach allowed me to build it out very fast, though in trnaslation you get some messy edges with all NURBS converting, but it sure rendered well for the finals.

A fun project which did not go to finish as they went with a simple 2D white text over photography instead.

Cheers, THOM

Wednesday, April 24, 2013

Project Review: Reels Slot Machines:Facebook App 3D Gamescreen Modeling 2012

 The final Subdivided 3D Model shot sent over to Chris at Blind for the App Reel Slot Tournament.

 The Base Quad Polygon Model without subdivision as delivered to the team and exported out as an OBJ and FBX for the Maya and C4d users.

 An overall Birdseye screen shot showing the build out for this App Game Screen.

 A close Up shot on the switch and blub panel from the lower right of the screen[ NOTE: The curled filaments inside the vintage 'nipple-top'bulbs]


 A close up on the Horn, and Marque details built and designed out in 3D for the App on Facebook.

 The Flipping/Rotating Player cards were built out in a tube frame to the LEFT.

 The original scrap I stated with on this one day Game Screen 3D Design and Modeling Gig from the Summer of 2012.

 A small screen Cap taken from the Facebook page of this App as it was finished out by the folks at Blind.


Project Review
Reels Slot Machines:Facebook App
3D Game-screen Modeling 2012

Client: Reels Slots Apps via Blind.
Art Direction: Chris Do.
Project Date: June 2012.

I had worked with Chris Do in the past on the Raveonettes Music Video where he won an Emmy for the Art Direction on it[ I did get Honors], and he had another fun task, only this time he needed 3D Modeling done for a game-screen for a slot App on Facebook.

I gladly took the work and was given a direction sheet to work off of and had a day or less to complete the job. I built out the assets as all subdivision models since this was to be exported out to their in house 3D team for finishing up.

A very fun assignment as I got to do 3D Design while I built it out as the direction gave me room to explore the designs a bit, and it was super fun to do. Enjoy the posting.

You can review my prior work with Chris Do from the Raveonettes here.

Cheers, THOM

Tuesday, April 23, 2013

Project Review:Jack The Giant Slayer 2013 Key Art 3D Illustration PART III:-The Cave City Matte Build

STEP ONE: The first pass at the blocking out of the city. A screen-grab as well as a simple test render with lighting and atmosphere to match up with the comp provided to me.


 STEP TWO: I flesh out a single structure to finish level to get approval on the level of finish since this is a one day job.

 The final render I delivered with a fully finished city over the background Low-Rez comp.


 A Close-Up of the City center from the final one day 3D Matte Painting Gig.


 A shot of the base Low Polygon Model with no Subdivision or Displacement added yet.


 The final High Poly Model with subdivision set at two and a displacement added to add in the groves and mud layers to the brick build very quickly.


 Here I show a close up of the displaced and subdivided geometry I created for this one day Matte build for the Key Art for Jack the Giant Slayer.

Project Review
Jack The Giant Slayer 2013
Key Art 3D Illustration PART III
The Cave City Matte Build

Client: Warner Brothers Pictures via Cold Open.
Art Director: Jeff Barnett, Gardner Defranceaux.
Project Date(s): Intermittent from Summer 2011- February 2013

I had the pleasure of working on the recent Key Art Movie Posters for the new film, Jack the Giant Slayer, and today in my PART III posting the 3D illustration Matte I did of the cave city for the finished Key Art.
Building out a fast matte painting is something that I have had to do a few times,and an advertising a digital 3D Matte Painting is very different from a regular film matte.

First and foremost is you get one day to do it, whereas on a film they spend weeks on a single shot , and I have to get them something very fast so you need to figure out methods to get very close, very quickly as you need time for the finished renders[ a few Hrs] as well and the budget and time-frames are always very compressed.

First step is I block out the main buildings put a texture that I will start with on there light it and add atmosphere and get it lined up to the comp provided. I then will take a single building and flesh it out as seen above to get then an idea of the level of finish I will bring in a day of work.

Once approved by the client, I proceed to finish the entire city out in 3D and render it at 6000 pixels wide for the finisher, which in this case was Lisa Carney, with whom I had worked for a few years together when we were at BLT and Associates a decade back.

A fun project, and you can view my first to posts on the film advertising and Key Art, here[Beanstalk], and here[Rock Carved Waterfall Head].

Cheers, THOM

Friday, April 19, 2013

Project Review: The fighting Temptations 2003. Key Art 3D Illustration of Handcuffs

 The final angle as delivered: Straight on Front view from The Fighting Temptations from back in 2003.


 A dropped camera with a lower angle emphasizing the open cuff below.


 A 3/4 side view showcasing the multi-plate design in the main cuff base.


This exploded view shows the basic build out I performed to create the prop. I built no internal gears or details, as this was not a see thru X-Ray project so I built out just the key pin that it slides onto inside, nothing else.

A Polygon render shows that many parts are just complex Pro-Booleans.


 Here is a Close up showing the recessed welds in the forged chain and the beveled teeth in the swing out ratcheted cuff arm.


Project Review
The fighting Temptations 2003
 Key Art 3D Illustration of Handcuffs

Client: Paramount Pictures Via BLT Communications.
Art Director: Ronnie Blumenberg, and Tracy Weston.
Project Date: March 2003.

I always like to revisit older projects in my body of 3D work I have done,and today I have put up a behind the art posting covering the 3D illustrations that I did for the One Sheet Key Art Presentations for the film, The Fighting Temptations, back in 2003 while I was in-house at BLT and Associates[ Now BLT Communications].

BLT understood it was faster and less expensive to have me build virtual handcuffs than to to thru the trouble of doing a Professional Photo shoot to get the asset, so they tasked me with a quick build and a few renders for the poster with a Virtual Photo shoot.

They wanted the cuffs built with one cuff swung open and I rendered it out a various angles for the comps needed. A job like this was a little over a half day, and I built this fast without a full subdivision model, though if it was today, I would now do it 100% subdivsion, but none the less they came out nice with the mini beveled plates stacked up and catching some light glints on the fun little ridges in the shots made a simple object look nice, and that is always a fun task at hand.

Cheers, THOM

Wednesday, April 17, 2013

Project Review: Pitch Black/Riddick DVD Key Art 2004.

The final shot delivered for packaging for the DVD for Riddick from back in 2004'.


A front view shot they wanted for the DVD menu comps is rendered here. I provided two alphas so they could cut out the back strap easily to put over a face as needed.


A side shot rendered with two alpha channels too, the advantage to a 3D illustration vs. a photo, they are Smart-3D masked and ready to go!


A 3/4 angles shot up front with some similar highlits on the lens.


The High Poly shot here is what level of detail was used for the finish render.


Here is a low poly base mesh shot showing the simple design build for the rubber molded frame.


Project Review
Pitch Black / Riddick
DVD Key Art 2004.

Client: via Universal Home Entertainment The Cimarron Group.
Art Direction: George Anderson.
Project Date Summer 2004.

Back in the Summer of 04' I was still running a small in-house 3D Design Department at The Cimarron Group, a Theatrical Adverting Agency in Hollywood, and for the Home Entertainment Division, I was asked to reproduce the prop from the film Riddick for the cover shots for the Key Art on the DVD and then new Blue-Ray packaging.

I was given the angle and lighting to match as well as a few screen grabs of the prop needed, this was his rubber special glasses he wore in the film.

I proceeded to build them out as a Subdivision Quad model and rendered it at a few angles as well so they could experiment a bit.

As with many daily projects this was a quick half day gig again. Fun and Fast!

Cheers, THOM

Tuesday, April 16, 2013

Project Review: SemoLogic-3D Logo Design Exploration 2006

  A concrete texture I built in Dark Tree as a Simbiont Procedural in 3DSmax used as a natural rock for this design pass.


 A self illuminated car-paint material was modified to glow and create the energy ball in the logo I created for the web.


 A warm version on an industrial concrete wall with a pumice procedural mixed in there too.


 A shader I modified from Rusty paint and use concrete in the paint channel[ a bit map] with procedurals for the rest.


 A lunar moon-like shader I modified to adjust the crater colors to fell like a dual layer material with a second inside peeking out thru the cracks.


 I mixed a few procedurals to create this look with pumice and scratches.


 A shot of the very simple scene. If I were to re-do this project today, I would do the objects all subdivision so I could displace the surface better as I do now on a regular basis.


Project Review
SemoLogic-3D Logo Design Exploration 2006

Client: Semo Logic via The Cimarron Group.
Art Direction: Eric Person.
Project Date: November 2006

When I was in-house at The Cimarron Group, I ran a little 3D Design Department that would meet the internal 3D needs of the various divisions in the company, and on many an occasion I worked with Eric Person up in the Online and then "Interactive division there.

I regularly did little project to be used in animations and logos for Eric,and for this client they wanted to do a full pass in 3D to see a natural rock like feel to the logos with a cinematic glow to spice up the brand. I obliged, and created this set of looks withe versions A thru F, for there review.

I use and build procedural shaders for natural looks as it is much better at dong a real 3D texture that goes thru the object so mapping is not needed. Procedural textures take longer to render as they are not 'pictures' applied to the mesh as with a regular bit-mapped [ JPG] image, but a mathematical formula using fractal design to create the algorithm to give the look a much more natural look. It is also built at render so it never pixelates as you move closer, it simply re-renders the texture higher and higher as you get closer and closer.

Cheers, THOM

Friday, April 12, 2013

Project Review: Night at the Museum PART III: T-Rex Head and Neck sculpt

The Final shot of the T-Rex Head and Spine I made for the first Night at The Museum advertising work back in 2006.


 I did a few alternates at a high and low angle as some comps needed a different angle and this is where 3D illustration becomes the best cost solution to the graphics needed.


I low angled shot of the head edge lit.

The base Poly as I built it ready for the subdivision to be added.
 

Here I have applied a subdivision to the Polygon Mesh at a low level of one.
[ quadruples the face count=4x]


The levels of subdivision were increased and for most shots this level worked fine.
 

A look at the Head and Neck Spine as built for a few 3/4 angles to show the full build needed.


Project Review
Night at the Museum

PART III: T-Rex Head and Neck sculpt
Client: Twentieth Century FOX via The Cimarron Group.
Art Director: Myself.
Project Date: Summer 2008.

For this  my third posting on the 3D Illustration and Motion Graphics Animation work I did for the advertising campaign for the two films, Night at the Museum, and today I am focusing on the T-Rex Head I sculpted out in 3D to have for 3D illustrations for the two films.

I have posted a shot in the past here, so today I cover a behind the Art build of that 3D Illustration in more detail.

I hand built the skull first as we had a little T-rex model we got online that was a bit cartoony in the face, so I rebuilt the head and neck as seen here for the majority of he comps as they all used the head poking into the shot at some point, so I built it out subdivision to use for close and long shots. I then added the neck too as that was also too rounded and not matching up to the film scrap I had at the time.


I also used the Simbiont Dark Tree procedurals to get the bone texture just right, as well as the Final Render Dirt Shader to get the aging into the nooks and cranny's in the head. The final finish was a black tar finish similar to the Museum bones found in the film.

You can review PART I here showcasing both films I did work on for the Advertising, or PART II with the Tablet here.


Cheers, THOM